一、什么是webpack
随着网页内容的越来越丰富,在我们的网页上我们经常要用到很多的脚本文件,比如幻灯模块的脚本、列表模块的脚本和搜索模块的脚本等等。如果不对这些文件进行统一的打包,整个页面就会非常的凌乱。
于是,webpack就诞生了,我们可以把它想象成一台洗衣机+烘干机+叠衣机(据说岛国已经发明类似的机器人了),我们可以把杂七杂八的衣服、裤子、袜子等等都丢进去,然后它就会帮我们洗干净、烘干、叠整齐了,一系列工作全自动完成,不需要我们亲自动手,怎么样,是不是很心动。
二、安装
//全局安装的作用是直接在命令行中使用
npm install -g webpack
//安装到项目目录,使用webpack的功能
npm install --save-dev webpack
三、创建项目
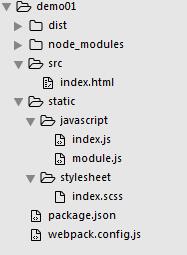
项目目录结构:
文件内容:
1. package.json
package.json 中包含各种所需模块以及项目的配置信息(名称、版本、许可证等)meta 信息。
{
  "name": "demo01",
  "version": "1.0.0",
  "description": "just learn webpack",
  "main": "index.js",
  "scripts": {
    "start": "webpack-dev-server --content-base build --inline --hot"
  },
  "author": "Rick.Xu",
  "license": "ISC",
  "dependencies": {},
  "devDependencies": {
    "autoprefixer": "^6.4.0",
    "babel-core": "^6.0.0",
    "babel-loader": "^6.0.0",
    "babel-plugin-transform-runtime": "^6.0.0",
    "babel-preset-es2015": "^6.0.0",
    "babel-preset-stage-2": "^6.0.0",
    "babel-register": "^6.0.0",
    "chalk": "^1.1.3",
    "connect-history-api-fallback": "^1.1.0",
    "css-loader": "^0.25.0",
    "eventsource-polyfill": "^0.9.6",
    "express": "^4.13.3",
    "extract-text-webpack-plugin": "^1.0.1",
    "file-loader": "^0.9.0",
    "function-bind": "^1.0.2",
    "html-webpack-plugin": "^2.8.1",
    "http-proxy-middleware": "^0.17.2",
    "json-loader": "^0.5.4",
    "node-sass": "^3.11.2",
    "opn": "^4.0.2",
    "ora": "^0.3.0",
    "sass-loader": "^4.0.2",
    "semver": "^5.3.0",
    "shelljs": "^0.7.4",
    "style-loader": "^0.13.1",
    "url-loader": "^0.5.7",
    "webpack": "^1.13.2",
    "webpack-dev-middleware": "^1.8.3",
    "webpack-hot-middleware": "^2.12.2",
    "webpack-merge": "^0.14.1"
  }
}
webpack.config.js
webpack.config.js是webpack的配置文件
var webpack =require('webpack');

var HtmlWebpackPlugin = require('html-webpack-plugin')

var path =require('path')


var static = path.resolve(path.resolve(__dirname), 'static')


module.exports = {
    entry: {
        index:'./static/javascript/index.js' //入口点
     },
    output: {
        path: path.resolve(__dirname,'dist'), //输出位置
        filename:'[name].js',                 //编译后的文件名
        publicPath:'./'                      //部署访问的路径
    },
    module: {
        loaders: [
         {test:/\.css$/,loader:'style!css'},
         {test:/\.scss$/,loader:"style!css!sass"} //sass加载器
      ]
     },
    devServer: {
        historyApiFallback: true,
        hot: true,
        inline: true,
        progress: true,
    },
    plugins:[
        new HtmlWebpackPlugin({
            filename: path.resolve(__dirname, './dist/index.html'), //编译后文件名
            template: './src/index.html',  //模板文件的位置
            inject: true,
            minify: {
                removeComments: true,
                collapseWhitespace: true,
                removeAttributeQuotes: true
            },
            chunksSortMode: 'dependency',
            chunks: ['manifest','vendor','index']//需要引入的Chunk,不配置就会引入所有页面的资源;index表示entry的key,说明该模板文件需要引入index.js
        }),
       new webpack.optimize.UglifyJsPlugin({    //压缩代码
            compress: {
           warnings: false
       },
       except: ['$super', '$', 'exports', 'require']    //排除关键字
      })
    ]
}
index.js
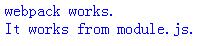
index.js是一个入口文件,该入口文件引用了两个模块module.js``index.scss
require('../stylesheet/index.scss');

document.write('webpack works.')
document.write(require('./module.js'))
- 模块
module.js
module.exports='<br/>It works from module.js.'
- 模块
index.scss
index.scss是一个样式文件
$myColor:blue;

body {
    color: $myColor;
}
四、编译
- 安装依赖
$ npm install
安装完成之后,我在项目路径下生成文件夹node_module
2. 编译打包
$ webpack
会在dist目录下生成文件index.html index.js,浏览器查看index.html,效果图如下