使用 vue-cli 开发多页应用(三)

使用 vue-cli 开发多页应用改webpack的配置,多入口即可。相当于多个单页面入口,这个时候你需要解决的问题,是如何webApp-A 跳转到 webApp-B 因为两个路由是不共用的---------- 这部分交给 nginx 去解决。

添加一个单页面

假设你现在需要点击一个页面index2.html,对应的入库是main2.js

全局配置

  • 修改 webpack.base.conf.js
entry: {
    app: './src/main.js',
    app2: './src/main2.js',
},

运行、编译的时候每一个入口都会对应一个Chunk

run dev 开发环境

  • 修改webpack.dev.conf.js

打开 buildwebpack.dev.conf.js ,在plugins下找到new HtmlWebpackPlugin,在其后面添加对应的多页,并为每个页面添加Chunk配置。

chunks: [‘app2′]中的app对应的是webpack.base.conf.js中entry设置的入口文件

plugins:[
    // https://github.com/ampedandwired/html-webpack-plugin
    // 多页:index.html → app.js
    new HtmlWebpackPlugin({
      filename: 'index.html',//生成的html
      template: 'index.html',//来源html
      inject: true,//是否开启注入
      chunks: ['app']//需要引入的Chunk,不配置就会引入所有页面的资源
    }),
    // 多页:index2.html → app2.js
    new HtmlWebpackPlugin({
      filename: 'index2.html',//生成的html
      template: 'index2.html',//来源html
      inject: true,//是否开启注入
      chunks: ['app2']//需要引入的Chunk,不配置就会引入所有页面的资源
    })
]

run build 编译

  • 修改 config/index.js
    打开config/index.js,找到build下的index: path.resolve(__dirname, ‘../dist/index.html’),在其后添加多页
build: {
    index: path.resolve(__dirname, '../dist/index.html'),
    index2: path.resolve(__dirname, '../dist/index2.html'),
},
  • 修改 webpack.prod.conf.js

打开buildwebpack.prod.conf.js,在plugins下找到new HtmlWebpackPlugin,在其后面添加对应的多页,并为每个页面添加Chunk配置

HtmlWebpackPlugin中的filename引用的是 config/index.js中对应的 build

plugins: [
    // 多页:index.html → app.js
    new HtmlWebpackPlugin({
        filename: config.build.index,
        template: 'index.html',
        inject: true,
        minify: {
            removeComments: true,
            collapseWhitespace: true,
            removeAttributeQuotes: true
            // more options:
            // https://github.com/kangax/html-minifier#options-quick-reference
        },
        // necessary to consistently work with multiple chunks via CommonsChunkPlugin
        chunksSortMode: 'dependency',
        chunks: ['manifest','vendor','app']//需要引入的Chunk,不配置就会引入所有页面的资源
    }),
    // 多页:index2.html → app2.js
    new HtmlWebpackPlugin({
        filename: config.build.index2,
        template: 'index2.html',
        inject: true,
        minify: {
            removeComments: true,
            collapseWhitespace: true,
            removeAttributeQuotes: true
        },
        chunksSortMode: 'dependency',
        chunks: ['manifest','vendor','app2']//需要引入的Chunk,不配置就会引入所有页面的资源
    }),
]

参考链接:
https://segmentfault.com/a/1190000007287998
https://www.zhihu.com/question/41339583/answer/90614536
http://www.tuicool.com/articles/MBF3emR
webpack vue-cli vue-router sass bootstrap 构建的项目(二)

  • index.html
<!DOCTYPE html>
<html>
  <head>
    <meta charset="utf-8">
    <title>meb</title>
    <link href="http://cdn.bootcss.com/bootstrap/3.3.7/css/bootstrap.min.css" rel="stylesheet">
    <script src="http://cdn.bootcss.com/jquery/3.1.1/jquery.min.js"></script>
  </head>
  <body>
   <div id="test"></div>
   <hr>

   <div id="product"></div>
    <hr>

   <!--测试路由-->
   <div id="menu">
      <!-- 点击链接-->
      <ul>
        <li><router-link to="/product">/product</router-link></li>
        <li><router-link to="/app">/app</router-link></li>
      </ul>
      <!--显示位置-->
      <router-view></router-view>
   </div>
  </body>   
</html>
  • main.js
import Vue from 'vue'
import VueRouter from 'vue-router'
import VueResource from 'vue-resource'
import Product from './product' //只要引入了,样式就会使用到了
import App from './App'


//开启debug模式
Vue.config.debug = true;

Vue.use(VueRouter);
Vue.use(VueResource);


//component id避免html tag,不然会出现警告:
//Do not use built-in or reserved HTML elements as component id: Div 
//所以我命名为`MyDiv`,而不是Div
const MyDiv = { template: '<div class="a"><h2>我是第 1 个子页面</h2></div>'} 
new Vue({
    el: '#app',
    template: "<MyDiv/>",
    components: {MyDiv}
})


/////////////////template方式显示组件/////////////////////
new Vue({
    el: '#product',
    template: '<Product/>',
    components: {Product}   //注册组件
})


/////////////////render方式显示组件/////////////////////
new Vue({
    el: '#test',
    render: h => h(Product)
})

/////////////////显示路由功能/////////////////////
const router = new VueRouter({
  mode: 'history',
  routes: [
    { path: '/app',
      component:App
    },
    {
      path: '/product',
      component: Product
    }
  ]
})

new Vue({
    router,
    el: '#menu'
})
  • product.vue
<template>
<div id="product">
    <h1>this is produt list</h1>
    <span>{{msg}}</span>
    <button type="button" class="btn btn-default">Default</button>
    <button type="button" class="btn btn-primary">Primary</button>
</div>
</template>


<script>
    //var $ = require('jquery')
    //import $ from 'jquery'
  /* $(function() {
       alert($('#product').html());
    })*/

    export default {
      name: 'product',
      data() {
        return {
            msg: "this is a message from product"
        }
      }
    }
</script>

<!--lang="scss" 开启scss功能-->
<style lang="scss">
    $blue: #1875e7;

    #product {
        color: $blue;
    }
</style>

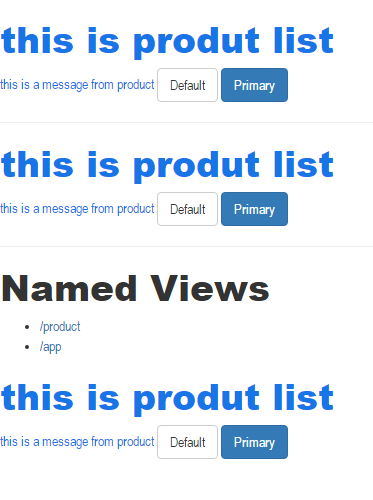
页面效果:
http://xhope.top/wp-content/uploads/2016/11/23.png

webpack vue-cli 构建的项目(一)

注意node npm版本

"node": ">= 4.0.0",
"npm": ">= 3.0.0"
  • 执行以下命令
# 全局安装 vue-cli
$ npm install -g vue-cli
# 创建一个基于 "webpack" 模板的新项目
$ vue init webpack my-project
# 安装依赖,走你
$ cd my-project
$ npm install
  • 在开发过程中,使用命令
$ npm run dev

访问http://localhost:8080/

  • 生产环境打包
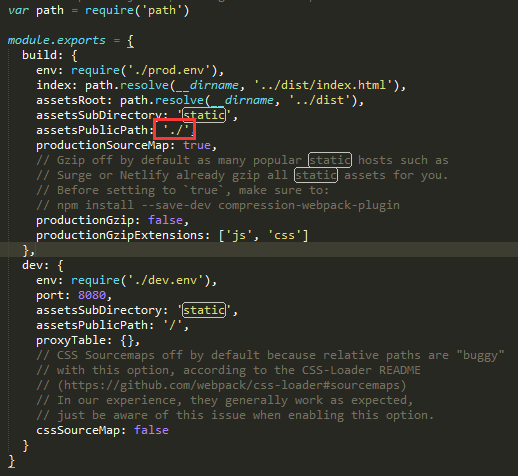
    打包之前,修改config/index.js文件

http://xhope.top/wp-content/uploads/2016/11/11.png

$ npm run build

双击dist/index.html

第一个React程序

开发程序示例

  • index.html
<!DOCTYPE html>
<html lang="en">
<head>
    <meta charset="UTF-8">
    <title>let const变量</title>
</head>
<body>
    <div id="example"></div>


    <script src="http://cdn.bootcss.com/react/15.3.2/react.min.js"></script>
    <script src="http://cdn.bootcss.com/react/15.3.2/react-dom.js"></script>

    <script src="browser.min.js"></script>

    <script type="text/babel" src="src/test.js"></script>
</body>
</html>

一共用了三个库: react.jsreact-dom.jsBrowser.js,它们必须首先加载。其中,react.js 是 React 的核心库,react-dom.js是提供与 DOM 相关的功能,Browser.js的作用是将 JSX 语法转为 JavaScript 语法,这一步很消耗时间,实际上线的时候,应该将它放到服务器完成。

  • test.js
//JSX语法
ReactDOM.render(
 <h1>Hello, China!</h1>, 
 document.getElementById('example')
); 

//es6语法,纯测试打包
let input = [];
input.map(item => item + 1); 

在服务器环境下运行:http://localhost:8080/react/a.html,会打印Hello, China!

babel人肉打包

  • 省略安装babel安装命令
  • .babelrc
    注意此文件要在命令行创建:否则有可能创建不成功,命令touch .babelrc
{
    "presets": [
      "es2015",
      "react"
    ],
    "plugins": []
  }

执行命令:

$ babel src --out-dir build

这个时候在build目录下回出现test.js,babel把ES6与JSX同时编译。编译后的效果如下:

'use strict';

//JSX语法
ReactDOM.render(React.createElement(
  'h1',
  null,
  'Hello, China!'
), document.getElementById('example'));

//es6语法
var input = [];
input.map(function (item) {
  return item + 1;
});

调用页面index.html,type属性由原来的type/babel => type/javascript才能正确加载编译后的test.js

<script type="text/javascript" src="build/test.js"></script>

项目目录结构:
Alt text

参考文档

http://www.ruanyifeng.com/blog/2016/01/babel.html

http://www.07net01.com/2016/05/1499081.html

http://www.tuicool.com/articles/v6rQfye

http://reactjs.cn/react/docs/getting-started.html

http://www.css88.com/archives/5632#more-5632

http://www.ruanyifeng.com/blog/2015/03/react.html

https://segmentfault.com/a/1190000004170151

跨域问题–服务器配置(二)

跨域问题–JSONP(一)中使用的是JSONP的hack方式去解决跨越调用的问题。更常规的方式是通过服务器配置。
下面通过配置apache解决跨越问题,nginx的可以根据查询相关资料

修改配置文件httpd.conf
去掉注释LoadModule headers_module modules/mod_headers.so
在节点Directory中添加:

Header set Access-Control-Allow-Origin "*"

remote2.php

<?php
    $a = $_GET['a'];
    $b = $_GET['b'];
    $c = $a + $b;

    echo '{"result":"'.$c.'"}'; //从前台获取a和b,将a+b结果返回到回调函数
?>

test.html

<!DOCTYPE html>
<html lang="en">
<head>
    <meta charset="UTF-8">
    <title>JSONP</title>
</head>
<body>
   <script src="http://cdn.bootcss.com/jquery/3.1.1/jquery.min.js"></script>

   <script>
       $.getJSON("http://localhost:8080/remote2.php?a=2&b=9", function(data) {//像调用本地后台方法一样
            alert(data.result);
       })
   </script>
</body>
</html>