a poem from an unprofessional poet

I use my poor english to complete virgo works,hope you will like it. thanks.

Time flies, things changes, How I wish I could hold all these.
The flower not matter how beautifual it is,it always perish in the end.
Disaster is around us momemt by moment, if you are not able to conquer,then fall into hell.
I’m lazy,my girlfriend is lazy,my family are lazy,these are not the most important,because
we are young and healthy,we always think time and life are both limit. They will go away with nothing left
one day.At that time,fear,failure,helpless stuff our minds. I call this “empty life”,more seriously, “miserable life”

几首珍藏的诗话

一、手如柔荑,肤如凝脂,领如蝤蛴,齿如瓠犀。螓首蛾眉,巧笑倩兮,美目盼兮。-《诗经·卫风·硕人》

(虽然不知道是谁写的,也有好多字不认识,但是就是觉得这个女人很美。这就是汉语的魅力吧。)

查了之后,才知道怎么读:

荑:(ti题)通“稊”。草名。一种像稗子的草。这里用为草名之意。柔荑 róutí 植物初生的叶芽。用来比喻女子柔嫩洁白的手。

蝤蛴:(qiú求.qí其)天牛的幼虫。此处借以比喻妇女脖颈洁白丰润之美。

瓠:(hù互)瓠瓜。

犀:锋利、坚固。 这里的瓠犀是指瓠瓜的子,方正洁白,而比次整齐,后因以喻美女的牙齿。

螓:(qín秦)虫名。古书上指像蝉的一种昆虫。蝉的一种。体小,方头,广额而有文彩。

二、寻寻觅觅,冷冷清清,凄凄惨惨戚戚。-李清照《声声慢》

三、枯藤老树昏鸦。小桥流水人家。古道西风瘦马。夕阳西下,断肠人在天涯。-马致远《天净沙〃秋思》

现代诗也一样很美啊:

四、在我家的后园,可以看见墙外有两株树,一株是枣树,还有一株也是枣树。-鲁迅《秋夜》

五、把短短的直巷 / 走成一条 / 曲折 / 回荡的 / 万里愁肠  // 左一脚 / 十年 / 右一脚 / 十年  //  母亲啊 / 我正在努力 / 向您 / 走 / 来 -非马《醉汉》

六、下面左边是诗人秦观写苏轼的一封“信”,右边是茶杯上的字: 
               暮   赏                                            以 

          已             花                  

    时                       归                         可                

醒                                 去              

    微                        马                        也                心 

           力            如                

               酒   飞

左边的怎么读才能读出一首七绝?右边茶杯上的字,可以组成几句话?(答案稍后揭晓)

七、落雪飞芳树幽红雨淡霞薄月迷香雾流风舞艳花”20字,无论从哪一字起,无论顺读倒读,都能成五绝一首,可得四十首。

(上面回环诗是:醒时已暮赏花归,去马如飞酒力微。酒力微醒时已暮,赏花归去马如飞。茶杯上的字可组成五句话:可以清心也;以清心也可;清心也可以;心也可以清;也可以清心。)

八、石室诗士施氏,嗜狮,誓食十狮。氏时时适市视狮。十时,适十狮适市。是时,适施氏适市。氏视是十狮,恃矢势,使是十狮逝世。氏拾是十狮尸,适石室。石室湿,氏使侍拭石室。石室拭,氏始试食是十狮尸。食时,始识是十狮尸,实十石狮尸。试释是事。-语言学家赵元任《施氏食狮史》

果戈理说:俄罗斯语言的“每一个声音都是一件馈赠,都是大粒的珍珠,有的名称比东西本身还要珍贵”。汉语不也正是如此吗?

windows下Apache+tomcat集群-基于Proxy的方式

1. 准备工作

1.下载Apache:http://httpd.apache.org/
2. 下载Tomcat:http://httpd.apache.org/
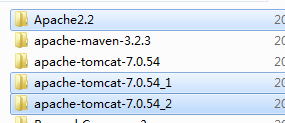
本人用的tomcat7,解压下来复制一份,就可以做两个tomcat的集群。
安装目录如下:

2. 集群配置

Tomcat配置
tomcat-7.0.54_1:
apache-tomcat-7.0.54_1\conf\server.xml:
更改端口,因为两个tomcat使用的默认端口都是8080,所有修改tomcat1的端口8081
Line 70:

<Connector port="8081" protocol="HTTP/1.1"  
              connectionTimeout="20000"  
              redirectPort="8443" />  

接着修改AJP的端口,默认8009,修改成8019,同时打开引擎如下:
Line92:

<Connector port="8109" protocol="AJP/1.3" redirectPort="8443" />  
  
  <!-- An Engine represents the entry point (within Catalina) that processes  
       every request.  The Engine implementation for Tomcat stand alone  
       analyzes the HTTP headers included with the request, and passes them  
       on to the appropriate Host (virtual host).  
       Documentation at /docs/config/engine.html -->  
  
  <!-- You should set jvmRoute to support load-balancing via AJP ie :  
  <Engine name="Catalina" defaultHost="localhost" jvmRoute="jvm1">  
  -->  
  <Engine name="Catalina" defaultHost="localhost" jvmRoute="tomcat1">  

tomcat-7.0.54_2:
端口使用tomcat默认的8080,AJP使用默认的端口8009,
只需要打开Engiee引擎

<Engine name="Catalina" defaultHost="localhost" jvmRoute="tomcat2">  

Apache配置:
Apache的默认端口是80
Apache2.2\conf\httpd.conf最后加入
ProxyRequests Off   

PS:1. 这儿的端口8009和8019是AJP的端口,不是访问Tomcat的HTTP端口。
       

  <proxy balancer://cluster>   
          BalancerMember ajp://127.0.0.1:8009 loadfactor=1 route=tomcat1  
          BalancerMember ajp://127.0.0.1:8109 loadfactor=1 route=tomcat2  
   </proxy>  

2.  route要和Tomcat中配置的名称相同。

集群配置完毕,可以往被集群的Tomcat的webapp下部署文件。启动Apache、Tomcat1、Tomcat2。
访问地址:http://localhost/项目名称。这里其实是访问的Apache服务器,由Apache集群去找Tomcat服务器。

quartz集成spring下的集群配置

写在前头

   
spring3.0
以后就开始支持quartz2.x,因为org.quartz.CronTrigger2.0class变成了一个interface,Spring4.0.6配置文件中使用CronTriggerFactoryBean来集成quartz2.x,使用CronTriggerBean来集成quartz1.8.x及以前版本.

准备环境

我用的是spring4.0.6 + quartz 2.1.7

1. quartz官网:http://www.quartz-scheduler.org/

2. spring集成环境

<dependency> 
    <groupId>org.quartz-scheduler</groupId> 
    <artifactId>quartz</artifactId> 
    <version>2.1.7</version> 
</dependency> 
<dependency> 
    <groupId>org.quartz-scheduler</groupId> 
    <artifactId>quartz-oracle</artifactId> 
    <version>2.1.7</version> 
</dependency> 
<dependency> 
    <groupId>org.quartz-scheduler</groupId> 
    <artifactId>quartz-weblogic</artifactId> 
    <version>2.1.7</version> 
</dependency> 
<dependency> 
    <groupId>org.quartz-scheduler</groupId> 
    <artifactId>quartz-jboss</artifactId> 
    <version>2.1.7</version> 
</dependency> 

环境搭建

1.      创建数据库表结构

文件路径:quartz-2.1.7\docs\dbTables\*.sql

选择对应数据库的脚本,然后执行。我选择的ORACLE.


2.      创建quartz.properties文件

#============================================================================ 
# Configure Main Scheduler Properties   
#============================================================================ 
org.quartz.scheduler.instanceName = EventScheduler    
org.quartz.scheduler.instanceId = AUTO   
  
org.quartz.threadPool.class = org.quartz.simpl.SimpleThreadPool  
org.quartz.threadPool.threadCount = 10  
org.quartz.threadPool.threadPriority = 5  
org.quartz.threadPool.threadsInheritContextClassLoaderOfInitializingThread = true  
  
 
#============================================================================ 
# Configure JobStore   
#============================================================================ 
org.quartz.jobStore.misfireThreshold = 60000  
org.quartz.jobStore.class = org.quartz.impl.jdbcjobstore.JobStoreTX 
# mysql  
#org.quartz.jobStore.driverDelegateClass=org.quartz.impl.jdbcjobstore.StdJDBCDelegate 
# Oracle  
org.quartz.jobStore.driverDelegateClass=org.quartz.impl.jdbcjobstore.oracle.OracleDelegate   
org.quartz.jobStore.tablePrefix = QRTZ_  
org.quartz.jobStore.maxMisfiresToHandleAtATime=10  
org.quartz.jobStore.isClustered = true   
org.quartz.jobStore.clusterCheckinInterval = 20000  

3.      创建spring配置文件applicationContext-job.xml

<?xml version="1.0" encoding="UTF-8"?> 
<beans xmlns="http://www.springframework.org/schema/beans" 
    xmlns:xsi="http://www.w3.org/2001/XMLSchema-instance" xmlns:context="http://www.springframework.org/schema/context" 
    xmlns:mvc="http://www.springframework.org/schema/mvc" 
    xmlns:p="http://www.springframework.org/schema/p" 
    xmlns:util="http://www.springframework.org/schema/util" 
    xsi:schemaLocation="     

http://www.springframework.org/schema/beans


http://www.springframework.org/schema/beans/spring-beans.xsd


http://www.springframework.org/schema/context


http://www.springframework.org/schema/context/spring-context.xsd


http://www.springframework.org/schema/mvc


http://www.springframework.org/schema/mvc/spring-mvc-3.1.xsd


http://www.springframework.org/schema/util

        http://www.springframework.org/schema/util/spring-util-3.2.xsd"> 
    <bean id="jobService" class="com.test.service.TestJobservice"/> 
    <!-- 定义任务 --> 
    <bean id="vcaEventJobTask" class="org.springframework.scheduling.quartz.JobDetailFactoryBean"> 
        <property name="jobClass"> 
            <!-- 上面的任务代理类 --> 
            <value>com.test.service.DetailQuartzJobBean</value> 
        </property> 
        <property name="jobDataAsMap"> 
            <map> 
                <!-- 实际的任务的Bean name,填上EventMonitorService的Bean name --> 
                <entry key="targetObject" value="jobService" /> 
                <!-- 执行Bean中的哪个方法 --> 
                <entry key="targetMethod" value="executeTask" /> 
            </map> 
        </property> 
        <property name="durability" value="true"></property>  
    </bean> 
  
    <!-- 任务触发器 --> 
    <bean id="eventTaskTrigger" class="org.springframework.scheduling.quartz.CronTriggerFactoryBean"> 
        <property name="jobDetail"> 
            <!-- 任务代理Bean name --> 
            <ref bean="vcaEventJobTask" /> 
        </property> 
        <property name="cronExpression"> 
            <!-- 配置表达式,这里表示每五分钟执行一次 --> 
            <value>0 0/1 * * * ?</value> 
        </property> 
    </bean> 
    <!-- 任务调度入口 --> 
    <bean autowire="no" 
        class="org.springframework.scheduling.quartz.SchedulerFactoryBean"> 
        <property name="dataSource"> 
            <ref bean="dataSource" /> 
        </property> 
        <!-- 任务列表,可以配置多个任务加入到该List --> 
        <property name="triggers"> 
            <list> 
               <ref bean="eventTaskTrigger"/>   
            </list> 
        </property> 
        <property name="configLocation" value="classpath:quartz.properties" /> 
        <property name="applicationContextSchedulerContextKey" value="applicationContext" /> 
        <property name="startupDelay" value="30" /> 
        <property name="autoStartup" value="true" /> 
        <property name="overwriteExistingJobs" value="true" /> 
    </bean> 
</beans> 

4.      创建任务类

代理类DetailQuartzJobBean.java

package com.test.service; 
import java.lang.reflect.Method; 
 
 
import org.quartz.JobExecutionContext; 
import org.quartz.JobExecutionException; 
import org.springframework.context.ApplicationContext;  
import org.springframework.scheduling.quartz.QuartzJobBean; 
 
public class DetailQuartzJobBean extends QuartzJobBean { 
     private ApplicationContext applicationContext;   
      
     private String targetObject; 
      
    private String targetMethod; 
      
     public String getTargetObject() { 
        return targetObject; 
    } 
 
 
    public void setTargetObject(String targetObject) { 
        this.targetObject = targetObject; 
    } 
 
    public String getTargetMethod() { 
        return targetMethod; 
    } 
 
    public void setTargetMethod(String targetMethod) { 
        this.targetMethod = targetMethod; 
    } 
 
 
    public ApplicationContext getApplicationContext() {  
        return applicationContext; 
    } 
       
     /** 
       * 从SchedulerFactoryBean注入的applicationContext. 
       */   
     public void setApplicationContext(ApplicationContext applicationContext) {   
        this.applicationContext = applicationContext;   
    }   
       
        @Override   
    protected void executeInternal(JobExecutionContext ctx) 
            throws JobExecutionException { 
        try { 
 
 
            // logger.info("execute [" + targetObject + "] at once>>>>>>"); 
            Object otargetObject = applicationContext.getBean(targetObject); 
            Method m = null; 
            try { 
                m = otargetObject.getClass().getMethod(targetMethod, 
                        new Class[] {}); 
                m.invoke(otargetObject, new Object[] {}); 
            } catch (SecurityException e) { 
                // logger.error(e); 
            } catch (NoSuchMethodException e) { 
                // logger.error(e); 
            } 
 
 
        } catch (Exception e) { 
            throw new JobExecutionException(e); 
        } 
    } 
} 

目标类TestJobservice.java

package com.test.service; 
 
import java.text.SimpleDateFormat; 
import java.util.Date; 
 
import org.slf4j.Logger; 
import org.slf4j.LoggerFactory; 
 
public class TestJobservice { 
 
    private static final transient Logger logger = LoggerFactory.getLogger(TestJobservice.class);   
     
    public void executeTask() { 
        logger.info("executing at " + new SimpleDateFormat("yyyy-MM-dd HH:mm:ss").format(new Date())); 
    } 
} 
 

Jquery插件范例

今天学习了Javascript的闭包和jQuery编写插件的实例,乘着热乎劲,写了个小的功能。

Html

<p>Hello Javascript<p>

Javacript

/*
    This is just a test!!!
     Hilight text,user-defined css style by function format
    @author Rick.Xu
*/

(function($) {
    var defaluts =  {
        css:{"color":"black","background-color":"yellow"}
       };

    $.fn.extend({hilight:function(settings) {
        var opts = $.extend(true,{},defaluts,settings);  
        return this.each(function() {
            var $this = $(this);
            if(opts.format) {
                var txt = opts.format($this.html());
                $this.html(txt);
            }
            $this.css(opts.css);
            
        });
    }});
})(jQuery);

$(function() {
    $("p").hilight({
        css:{
            color:"red"
        },
        format:function(txt) {
            return "<I>"+txt+"</I>";
        }
    });
});

Result:

Hello Javascript

jQuery插件开发