<!doctype html>
<html lang="en">
<head>
<meta charset="UTF-8">
<title>Web的Flex弹性盒模型</title>
<style>
body{
font-family: '微软雅黑';
/*font-family: cursive, '微软雅黑';*/
padding: 0;
margin: 20px 0 40px;
font-size: 16px;
background-color: #F9F9F9;
}
h1{
color: #0BF;
text-indent: 15px;
}
h3{
color: #6D7273;
text-indent: 15px;
padding: 10px 0;
background-color: #fff;
}
p{
margin: 0;
padding: 0;
color: #666;
margin-bottom: 5px;
}
.boxes{
padding: 0 10px;
overflow: hidden;
display: -webkit-flex;
flex-wrap: wrap;
align-content:flex-start
}
.box{
width: 400px;
padding: 8px;
margin-right: 20px;
margin-bottom: 10px;
display: inline-block;
box-shadow: 2px 2px 3px 1px #E0E0E0;
}
.boxstyle{
padding: 8px 0;
}
.boxborder{
border: 1px dashed #B6B6B6;
}
.demo{
color: #fff;
display: -webkit-flex;
text-align: center;
}
.demo .item{
line-height: 40px;
background-color: #ddd;
}
.demo .item:nth-child(1){
background-color: #E46C49;
}
.demo .item:nth-child(2){
background-color: #37B0D3;
}
.demo .item:nth-child(3){
background-color: #68B33D;
}
.demo .item:nth-child(4){
background-color: #E46775;
}
.demo .item:nth-child(5){
background-color: #CFC731;
}
.demo .item:nth-child(6){
background-color: #8370F4;
}
.demo .item span{
display: block;
}
.demo2 .item{
height: 60px;
width: 150px;
word-wrap: break-word;
line-height: 1.5;
}
.demo-row{
flex-direction: row;
}
.demo-row-reverse{
flex-direction: row-reverse;
}
.demo-column{
height: 200px;
flex-direction: column;
}
.demo-column-reverse{
height: 200px;
flex-direction: column-reverse;
}
.demo-nowrap{
-webkit-flex-wrap: nowrap;
width: 400px;
}
.demo-wrap{
-webkit-flex-wrap: wrap;
width: 400px;
}
.demo-wrap-reverse{
-webkit-flex-wrap: wrap-reverse;
width: 400px;
}
.demo-align-content{
width: 400px;
flex-wrap: wrap;
height:200px;
border: 1px dashed #B6B6B6;
}
.demo-align-content .item:nth-child(1), .demo-align-content .item:nth-child(2), .demo-align-content .item:nth-child(3),
.demo-align-content .item:nth-child(4), .demo-align-content .item:nth-child(5), .demo-align-content .item:nth-child(6){
background-color: #717171;
width: 80px;
margin: 2px 10px;
}
</style>
</head>
<body>
<h1>Web的Flex弹性盒模型</h1>
<section class="content">
<h3>[ flex ]</h3>
<div class="boxes">
<div class="box">
<div class="boxstyle">
<p>display: -webkit-flex;</p>
</div>
<div class="demo demo1">
<div class="item" style="width:100px">width:100px;</div>
<div class="item" style="flex:2">flex: 2;</div>
<div class="item" style="flex:1">flex: 1;</div>
</div>
</div>
<div class="box">
<div class="boxstyle">
<p>display: -webkit-flex; </p>
</div>
<div class="demo demo2 boxborder">
<div class="item" style="margin-right:10px;">
<span>width:150px;</span> <span>margin-right:10px;</span></div>
<div class="item" style="flex:1">flex: 1;</div>
<div class="item" style="margin-left:10px;">
<span>width:150px;</span> <span>margin-left:10px;</span></div>
</div>
</div>
</div>
<h3>[ flex-direction ]</h3>
<div class="boxes" style="width:900px">
<div class="box">
<div class="boxstyle">
<p>flex-direction: row; /*default*/</p>
<p>display: -webkit-flex;</p>
</div>
<div class="demo demo-row">
<div class="item" style="flex:1">flex: 1;</div>
<div class="item" style="flex:2">flex: 2;</div>
<div class="item" style="flex:3">flex: 3;</div>
</div>
</div>
<div class="box">
<div class="boxstyle">
<p>flex-direction: row-reverse;</p>
<p>display: -webkit-flex; </p>
</div>
<div class="demo demo-row-reverse">
<div class="item" style="flex:1">flex: 1;</div>
<div class="item" style="flex:2">flex: 2;</div>
<div class="item" style="flex:3">flex: 3;</div>
</div>
</div>
<div class="box">
<div class="boxstyle">
<p>flex-direction: column;</p>
<p>display: -webkit-flex; </p>
</div>
<div class="demo demo-column">
<div class="item" style="flex:1">flex: 1;</div>
<div class="item" style="flex:2">flex: 2;</div>
<div class="item" style="flex:3">flex: 3;</div>
</div>
</div>
<div class="box">
<div class="boxstyle">
<p>flex-direction: column-reverse;</p>
<p>display: -webkit-flex; </p>
</div>
<div class="demo demo-column-reverse">
<div class="item" style="flex:1">flex: 1;</div>
<div class="item" style="flex:2">flex: 2;</div>
<div class="item" style="flex:3">flex: 3;</div>
</div>
</div>
</div>
<h3>[ flex-wrap ]</h3>
<div class="boxes" style="width:1310px">
<div class="box">
<div class="boxstyle">
<p>-webkit-flex-wrap: nowrap; /* default */</p>
<p>display: -webkit-flex; </p>
<p>width: 400px</p>
</div>
<div class="demo demo-nowrap">
<div class="item" style="width: 100px">100px;</div>
<div class="item" style="width: 200px">width: 200px;</div>
<div class="item" style="width: 300px">width: 300px;</div>
</div>
</div>
<div class="box">
<div class="boxstyle">
<p>-webkit-flex-wrap: wrap</p>
<p>display: -webkit-flex; </p>
<p>width: 400px</p>
</div>
<div class="demo demo-wrap boxborder">
<div class="item" style="width: 100px">100px;</div>
<div class="item" style="width: 200px">width: 200px;</div>
<div class="item" style="width: 300px">width: 300px;</div>
</div>
</div>
<div class="box">
<div class="boxstyle">
<p>-webkit-flex-wrap: wrap-reverse</p>
<p>display: -webkit-flex; </p>
<p>width: 400px</p>
</div>
<div class="demo demo-wrap-reverse boxborder">
<div class="item" style="width: 100px">100px;</div>
<div class="item" style="width: 200px">width: 200px;</div>
<div class="item" style="width: 300px">width: 300px;</div>
</div>
</div>
</div>
<h3>[ flex-flow ]: flex-direction flex-wrap; /* 自个体会吧 */</h3>
<h3>[ justify-content ]</h3>
<div class="boxes" style="width:1310px;">
<div class="box">
<div class="boxstyle">
<p>/* 效果如同 float:left; */</p>
<p>justify-content: flex-start; /* default */</p>
<p>display: -webkit-flex;</p>
</div>
<div class="demo boxborder" style="justify-content: flex-start;">
<div class="item" style="width:100px">width:100px;</div>
<div class="item" style="width:100px">width:100px;</div>
</div>
</div>
<div class="box">
<div class="boxstyle">
<p><p>/* 效果如同 float:right; */</p></p>
<p>justify-content: flex-end;</p>
<p>display: -webkit-flex;</p>
</div>
<div class="demo demo-justify boxborder" style="justify-content: flex-end;">
<div class="item" style="width:100px">width:100px;</div>
<div class="item" style="width:100px">width:100px;</div>
</div>
</div>
<div class="box">
<div class="boxstyle">
<p>/* 第三代水平居中方案 */</p>
<p>justify-content: center;</p>
<p>display: -webkit-flex;</p>
</div>
<div class="demo demo-justify-end boxborder" style="justify-content: center;">
<div class="item" style="width:100px">width:100px;</div>
<div class="item" style="width:100px">width:100px;</div>
</div>
</div>
<div class="box">
<div class="boxstyle">
<p>justify-content: space-between; </p>
<p>display: -webkit-flex;</p>
</div>
<div class="demo demo-justify boxborder" style="justify-content: space-between;">
<div class="item" style="width:100px">width:100px;</div>
<div class="item" style="width:100px">width:100px;</div>
</div>
</div>
<div class="box">
<div class="boxstyle">
<p>justify-content: space-around; </p>
<p>display: -webkit-flex;</p>
</div>
<div class="demo demo-justify-end boxborder" style="justify-content: space-around;">
<div class="item" style="width:100px">width:100px;</div>
<div class="item" style="width:100px">width:100px;</div>
</div>
</div>
</div>
<h3>[ align-self ]</h3>
<div class="boxes">
<div class="box" style="width:1000px;">
<div class="boxstyle">
<p>display: -webkit-flex;</p>
</div>
<div class="demo boxborder" style="width: 1000px; height:200px;">
<div class="item" style="width:200px; align-self:flex-start;">align-self:flex-start;</div>
<div class="item" style="width:200px; align-self:flex-end;">align-self:flex-end;</div>
<div class="item" style="width:200px; align-self:center;">align-self:center;</div>
<div class="item" style="width:200px; align-self:auto;">
<span>align-self:auto;</span>
<span>/*default */</span>
</div>
<div class="item" style="width:200px; align-self:baseline;">align-self:baseline;</div>
<div class="item" style="width:200px; align-self:stretch;">align-self:stretch;</div>
</div>
</div>
</div>
<h3>[ align-items ]</h3>
<div class="boxes">
<div class="box">
<div class="boxstyle">
<p>align-items: flex-start; /* default */</p>
<p>display: -webkit-flex;</p>
</div>
<div class="demo boxborder" style="align-items: flex-start;height:200px;">
<div class="item" style="width:100px">width:100px;</div>
<div class="item" style="width:100px">width:100px;</div>
</div>
</div>
<div class="box">
<div class="boxstyle">
<p>align-items: flex-end; </p>
<p>display: -webkit-flex;</p>
</div>
<div class="demo boxborder" style="align-items: flex-end;height:200px;">
<div class="item" style="width:100px">width:100px;</div>
<div class="item" style="width:100px">width:100px;</div>
</div>
</div>
<div class="box">
<div class="boxstyle">
<p>/* 第三代垂直居中 */</p>
<p>align-items: center; </p>
<p>display: -webkit-flex;</p>
</div>
<div class="demo boxborder" style="align-items: center;height:200px;">
<div class="item" style="width:100px">width:100px;</div>
<div class="item" style="width:100px">width:100px;</div>
</div>
</div>
<div class="box">
<div class="boxstyle">
<p>align-items: baseline; </p>
<p>display: -webkit-flex;</p>
</div>
<div class="demo boxborder" style="align-items: baseline;height:200px;">
<div class="item" style="width:100px">width:100px;</div>
<div class="item" style="width:100px">width:100px;</div>
</div>
</div>
<div class="box">
<div class="boxstyle">
<p>align-items: stretch; </p>
<p>display: -webkit-flex;</p>
</div>
<div class="demo boxborder" style="align-items: stretch;height:200px;">
<div class="item" style="width:100px; height:100px;">height:100px;</div>
<div class="item" style="width:150px; min-height:20px;">min-height:20px;</div>
<div class="item" style="width:150px; max-height:60px;">max-height:60px;</div>
</div>
</div>
</div>
<h3>[ align-content ]</h3>
<div class="boxes">
<div class="box">
<div class="boxstyle">
<p>/* <span style="color:red"> 对比 align-items</span>*/</p>
<p>align-items: flex-start</p>
<p>display: -webkit-flex;</p>
</div>
<div class="demo demo-align-content" style="align-items: flex-start">
<div class="item" >a</div>
<div class="item" >b</div>
<div class="item" >c</div>
<div class="item" >d</div>
<div class="item" >e</div>
<div class="item" >f</div>
</div>
</div>
<div class="box">
<div class="boxstyle">
<p>align-content: flex-start; </p>
<p>display: -webkit-flex;</p>
</div>
<div class="demo demo-align-content" style="align-content: flex-start;">
<div class="item" >a</div>
<div class="item" >b</div>
<div class="item" >c</div>
<div class="item" >d</div>
<div class="item" >e</div>
<div class="item" >f</div>
</div>
</div>
<div class="box">
<div class="boxstyle">
<p>align-content: flex-end; </p>
<p>display: -webkit-flex;</p>
</div>
<div class="demo demo-align-content" style="align-content: flex-end;">
<div class="item" >a</div>
<div class="item" >b</div>
<div class="item" >c</div>
<div class="item" >d</div>
<div class="item" >e</div>
<div class="item" >f</div>
</div>
</div>
<div class="box">
<div class="boxstyle">
<p>align-content: center; </p>
<p>display: -webkit-flex;</p>
</div>
<div class="demo demo-align-content" style="align-content: center;">
<div class="item" >a</div>
<div class="item" >b</div>
<div class="item" >c</div>
<div class="item" >d</div>
<div class="item" >e</div>
<div class="item" >f</div>
</div>
</div>
<div class="box">
<div class="boxstyle">
<p>align-content: space-between; </p>
<p>display: -webkit-flex;</p>
</div>
<div class="demo demo-align-content" style="align-content: space-between;">
<div class="item" >a</div>
<div class="item" >b</div>
<div class="item" >c</div>
<div class="item" >d</div>
<div class="item" >e</div>
<div class="item" >f</div>
</div>
</div>
<div class="box">
<div class="boxstyle">
<p>align-content: space-around; </p>
<p>display: -webkit-flex;</p>
</div>
<div class="demo demo-align-content" style="align-content: space-around;">
<div class="item" >a</div>
<div class="item" >b</div>
<div class="item" >c</div>
<div class="item" >d</div>
<div class="item" >e</div>
<div class="item" >f</div>
</div>
</div>
<div class="box">
<div class="boxstyle">
<p>align-content: stretch; /*default*/ </p>
<p>display: -webkit-flex;</p>
</div>
<div class="demo demo-align-content" style="align-content: stretch;">
<div class="item" >a</div>
<div class="item" >b</div>
<div class="item" >c</div>
<div class="item" >d</div>
<div class="item" >e</div>
<div class="item" >f</div>
</div>
</div>
</div>
<h3>[ order ]</h3>
<div class="boxes">
<div class="box" style="width:1000px;">
<div class="boxstyle">
<p>display: -webkit-flex;</p>
</div>
<div class="demo demo-align-content" style="width: 1000px;height:40px;">
<div class="item" >a</div>
<div class="item" >b</div>
<div class="item" >c</div>
<div class="item" style="order:-1; width:120px"> d (order:-1) </div>
<div class="item" >e</div>
<div class="item" >f</div>
</div>
</div>
</div>
</section>
</body>
</html>
build.xml模板
<?xml version="1.0" ?>
<project name="AntExample1" default="war">

    <path id="compile.classpath">
        <fileset dir="WebContent/WEB-INF/lib">
            <include name="*.jar"/>
        </fileset>
        <fileset dir="D:\develop\jboss-eap-6.2\modules\system\layers\base">
            <include name="**/*.jar"/>
        </fileset>
    </path>

    <target name="init">
        <mkdir dir="build/classes"/>
        <!--拷贝非java文件-->
        <copy includeemptydirs="false" todir="build/classes">
            <fileset dir="src">
                <exclude name="**/*.java"/>
            </fileset>
        </copy>

        <mkdir dir="dist" />
    </target>

    <target name="compile" depends="init" >
        <javac destdir="build/classes" debug="true" encoding="UTF-8">
            <classpath refid="compile.classpath"/>
            <src path="src"/>
        </javac>
    </target>

    <target name="war" depends="compile">
        <war destfile="dist/SpaceMgt_HK.war" webxml="WebContent/WEB-INF/web.xml">
            <fileset dir="WebContent"/>
            <!--<lib dir="WebContent/WEB-INF/lib"/>-->
            <classes dir="build/classes"/>
        </war>
    </target>

    <target name="clean">
        <delete dir="dist" />
        <delete dir="build" />
    </target>

</project>
用Maven分环境打包非Maven项目
现在有一个项目,不是用
maven构建的,想通过maven进行各个环境的打包,比如dev/sit/prd环境jdbc.properties是不相同的。不能破坏原来的目录结构,同时实现以下功能:
1. 多环境打包
2. 结合ant插件清理临时文件,支持war上传FTP
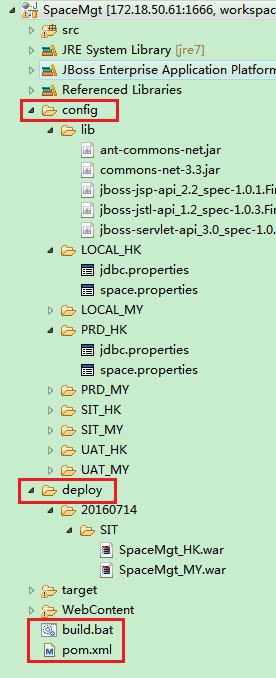
工程目录

修改如下
* 创建文件夹config放置文件jdbc.properties和打包所需要的provided jar
* 添加pom.xml
* bat执行脚本
1 .配置文件目录
config是在项目的一级目录,和src同一级
|-config
|-LOCAL_HK
|-jdbc.properties
|-SIT_HK
|-jdbc.properties
2. pom.xml
<?xml version="1.0" encoding="UTF-8"?>
<project xmlns="http://maven.apache.org/POM/4.0.0" xmlns:xsi="http://www.w3.org/2001/XMLSchema-instance"
    xsi:schemaLocation="http://maven.apache.org/POM/4.0.0 http://maven.apache.org/maven-v4_0_0.xsd">
    <modelVersion>4.0.0</modelVersion>
    <groupId>com.asw.spacemgt</groupId>
    <artifactId>asw</artifactId>
    <version>V1.5.0.${maven.build.timestamp}</version>
    <packaging>war</packaging>
    <name>SpaceMgt</name>

    <properties>
        <maven.build.timestamp.format>yyyyMMdd</maven.build.timestamp.format>
        <!-- 文件拷贝时的编码 -->
        <project.build.sourceEncoding>UTF-8</project.build.sourceEncoding>
        <project.reporting.outputEncoding>UTF-8</project.reporting.outputEncoding>
        <!-- 编译时的编码 -->
        <maven.compiler.encoding>UTF-8</maven.compiler.encoding>
        <!--ftp配置信息 -->
        <ftp.server>172.18.50.126</ftp.server>
        <ftp.userid>alex</ftp.userid>
        <ftp.password>movit123.</ftp.password>
    </properties>

     <build>
        <!-- java code -->
        <sourceDirectory>src</sourceDirectory>

        <resources>
            <resource>
                <!--
                获取资源文件
                *.hbm.xml
                *.properties

                排除java文件+要替换的文件
                -->
                <directory>src</directory>
                <excludes>
                    <exclude>**/jdbc.properties</exclude>
                    <exclude>**/space.properties</exclude>
                    <exclude>**/*.java</exclude>
                </excludes>
            </resource>
            <resource>
                <!--执行文件替换-->
                <directory>config/${env}</directory>
                <targetPath>resource</targetPath>
            </resource>
        </resources>

        <plugins>
            <plugin>
                <groupId>org.apache.maven.plugins</groupId>
                <artifactId>maven-surefire-plugin</artifactId>
                <configuration>
                    <skip>true</skip>
                </configuration>
            </plugin>
            <plugin>
                <groupId>org.apache.maven.plugins</groupId>
                <artifactId>maven-compiler-plugin</artifactId>
                <configuration>
                    <source>1.7</source>
                    <target>1.7</target>
                    <encoding>UTF-8</encoding>
                    <compilerArguments>
                        <!--本地jar-->
                        <extdirs>WebContent\WEB-INF\lib</extdirs>
                    </compilerArguments>
                </configuration>
            </plugin>
            <plugin>
                <groupId>org.apache.maven.plugins</groupId>
                <artifactId>maven-war-plugin</artifactId>
                <configuration>
                    <webResources>
                        <resource>
                            <!--web app位置-->
                            <directory>WebContent</directory>
                        </resource>
                    </webResources>

                    <webXml>WebContent\WEB-INF\web.xml</webXml>
                </configuration>
            </plugin>
            <plugin>
               <artifactId>maven-antrun-plugin</artifactId>
               <version>1.7</version>
               <executions>
                    <execution>
                               <id>default-cli</id>
                               <goals>
                                     <goal>run</goal>
                               </goals>
                               <configuration>
                                    <target>
                                        <!--删除maven打包产生的临时目录-->
                                        <delete includeemptydirs="true">
                                            <fileset dir="deploy" >
                                                <exclude name="${maven.build.timestamp}/**/*.war"/>
                                            </fileset>
                                        </delete>
                                         <!--通过ftp创建文件夹-->
                                        <ftp server="${ftp.server}" userid="${ftp.userid}" password="${ftp.password}" action="mkdir" remotedir="/Space/war/sit/${maven.build.timestamp}"></ftp>
                                        <!--上传到FTP-->
                                        <ftp server="${ftp.server}" action="put" passive="true" remotedir="/Space/war/sit/${maven.build.timestamp}" userid="${ftp.userid}"
                                        password="${ftp.password}"  separator="/" verbose="yes" binary="yes">
                                             <fileset dir="deploy/${maven.build.timestamp}/SIT">
                                             </fileset>
                                         </ftp>
                                    </target>
                               </configuration>
                    </execution>
                </executions>
                <!--上传ftp依赖的jar-->
                <dependencies>
                     <dependency>
                        <groupId>commons-net</groupId>
                        <artifactId>commons-net</artifactId>
                        <version>3.3</version>
                        <scope>system</scope>
                        <systemPath>${project.basedir}/config/lib/commons-net-3.3.jar</systemPath>
                     </dependency>
                     <dependency>
                        <groupId>org.apache.ant</groupId>
                        <artifactId>ant-commons-net</artifactId>
                        <version>1.0</version>
                        <scope>system</scope>
                        <systemPath>${project.basedir}/config/lib/ant-commons-net.jar</systemPath>
                     </dependency>
                </dependencies>
            </plugin>
        </plugins>
    </build>

    <profiles>
        <profile>
            <id>LOCAL_HK</id>
            <properties>
                <env>LOCAL_HK</env>
                <buCode>HK</buCode>
            </properties>
            <build>
                <finalName>SpaceMgt_${buCode}</finalName>
                <directory>deploy/${maven.build.timestamp}/LOCAL</directory>
            </build>
        </profile>
        <profile>
            <id>SIT_HK</id>
            <properties>
                <env>SIT_HK</env>
                <buCode>HK</buCode>
            </properties>
            <build>
                <finalName>SpaceMgt_${buCode}</finalName>
                <directory>deploy/${maven.build.timestamp}/SIT</directory>
            </build>
        </profile>
    </profiles>

    <dependencies>
        <!-- lib不存在javax相关jar,编译期使用,不会打到war中 -->
        <dependency>
            <groupId>jboss</groupId>
            <artifactId>servlet</artifactId>
            <version>1.0</version>
            <scope>system</scope>
            <systemPath>${project.basedir}/config/lib/jboss-servlet-api_3.0_spec-1.0.2.Final-redhat-1.jar</systemPath>
        </dependency>
        <dependency>
            <groupId>jboss</groupId>
            <artifactId>jsp</artifactId>
            <version>1.0</version>
            <scope>system</scope>
            <systemPath>${project.basedir}/config/lib/jboss-jsp-api_2.2_spec-1.0.1.Final-redhat-2.jar</systemPath>
        </dependency>
        <dependency>
            <groupId>jboss</groupId>
            <artifactId>jstl</artifactId>
            <version>1.0</version>
            <scope>system</scope>
            <systemPath>${project.basedir}/config/lib/jboss-jstl-api_1.2_spec-1.0.3.Final-redhat-2.jar</systemPath>
        </dependency>
    </dependencies>
</project>
3. bat脚本
编写bat脚本build.bat
@echo build war
call mvn package -PLOCAL_HK
call mvn package -PSIT_HK
call mvn antrun:run
双击build.bat文件会在deploy文件下分目录产生,同时上传FTP。
最终目录结构:
相关链接:
获取FTP文件最后修改时间
-
如果FTP server和Web Server同一个时区
使用方法org.apache.commons.net.ftp.FTPClient#getModificationTimepublic String getModificationTime(String pathname)
throws IOException
Issue the FTP MDTM command (not supported by all servers) to retrieve the last modification time of a file. The modification string should be in the ISO 3077 form “YYYYMMDDhhmmss(.xxx)?”. The timestamp represented should also be in GMT, but not all FTP servers honour this.
Parameters:
pathname – The file path to query.
Returns:
A string representing the last file modification time in YYYYMMDDhhmmss format.
Throws:
IOException – if an I/O error occurs.
Since:
2.0该函数会获取
GMT时间,格式为:213 20160125035757。这时间和北京时间会差8个小时。按空格拆分字符串后使用如下方法获取北京时间20160125115757,主要是格式化添加时区sdf.setTimeZone(TimeZone.getTimeZone("GMT")),而不能按照默认的北京时间。因为FTP server和Web Server同一个时区,所以时间是一致的。
public static long getLongFromGMTDateString(String gmtDate, String format) throws Exception {
        SimpleDateFormat sdf = new SimpleDateFormat(format);
        sdf.setTimeZone(TimeZone.getTimeZone("GMT")); //默认就是系统设置时区
        Date date = sdf.parse(gmtDate);
        return date.getTime();   // Unix时间戳
}
-
如果FTP server和Web Server不在同一个时区
需要结合另外第一个方法org.apache.commons.net.ftp.FTPFile#getModificationTimepublic Calendar getTimestamp()
Returns the file timestamp. This usually the last modification time.
Returns:
A Calendar instance representing the file timestamp.这可以获取FTP时区的的最后修改时间,但是没有秒,结合方法
getModificationTime获取秒,拼接起来就可以获取完整的FPT文件最后修改时间。
常识
- Unix时间戳 1453694277000
->北京时间 2016/1/25 11:57:57
-> GMT 2016/1/25 03:57:57 - GMT –>北京时间
GMT-> Unix时间戳 -> 北京时间
【心理/精神病?】《天才在左 疯子在右》
基本信息:
书名:天才在左 疯子在右
作者:高铭
出版社:北京联合出版公司出版 2016年1月
ISBN 978-7-5502-6393-2
<ps:这本书没看完,因为感觉到有点压抑,虽然在很多人看来比较好笑,嘲笑的笑,嘲笑作者的无知,嘲笑情节俗套。>
知乎里对这本书的评价比较全面,既然看不下去,也就不想多说了。这类的书,我怕是无缘了,或许是过于接近心理层面的思考,太孤独冷清了。