1. 下载
下载地址: http://ckeditor.com/download
下载分为2种
-
直接下载
- Basic Package
- Standard Package(默认)
- Full Package
-
手动配置
我觉得手动配置插件Enhanced Image,上传图片是非常实用的。
2. 学习使用编辑器
文件下载完成后,打开路径samples/index,查看demo
CKEDITOR.editorConfig = function( config ) {

    config.toolbarGroups = [
                            { name: 'document', groups: [ 'mode', 'document', 'doctools' ] },
                            { name: 'clipboard', groups: [ 'clipboard', 'undo' ] },
                            { name: 'editing', groups: [ 'find', 'selection', 'spellchecker', 'editing' ] },
                            { name: 'forms', groups: [ 'forms' ] },
                            { name: 'basicstyles', groups: [ 'basicstyles', 'cleanup' ] },
                            { name: 'paragraph', groups: [ 'list', 'indent', 'blocks', 'align', 'bidi', 'paragraph' ] },
                            { name: 'styles', groups: [ 'styles' ] },
                            { name: 'colors', groups: [ 'colors' ] },
                            { name: 'insert', groups: [ 'insert' ] },
                            { name: 'links', groups: [ 'links' ] },
                            { name: 'tools', groups: [ 'tools' ] },
                            { name: 'others', groups: [ 'others' ] },
                            { name: 'about', groups: [ 'about' ] }
                        ];

                        config.removeButtons = 'Save,NewPage,Cut,Copy,Find,Replace,SelectAll,Form,Checkbox,Radio,TextField,Textarea,Select,Button,HiddenField,About,ShowBlocks,Language,Flash,Iframe,Scayt,Superscript,Subscript';


    config.filebrowserImageUploadUrl= ctx+"ckeditor/uploadImg"; //待会要上传的action或servlet
};
页面
<textarea id="contentForm-content" name="content"></textarea>
样式和事件
CKEDITOR.replace('contentForm-content', {
            height : 200
        });


        CKEDITOR.instances["contentForm-content"].on("instanceReady", function () {
            //set keyup event
            this.document.on("keyup", function() {


            });

        });
- TOOLBAR CONFIGURATOR,右上角点击可以配置显示
3. 自定义插件
如果添加文件上传插件,插件的名字叫file
目录结构如下:

a. 创建目录 ckeditor\plugins\file
b. 创建文件plugin.js
/**
 * @license Copyright (c) 2003-2015, CKSource - Frederico Knabben. All rights reserved.
 * For licensing, see LICENSE.md or http://ckeditor.com/license
 */

/**
 * @fileOverview File plugin
 */

( function() {
    CKEDITOR.plugins.add('file',
            {
                requires : ['dialog'],
                icons: 'file', // %REMOVE_LINE_CORE%
                init : function (editor)
                {
                    var pluginName = 'file';

                    //加载自定义窗口,就是dialogs前面的那个/让我纠结了很长时间
                    CKEDITOR.dialog.add(pluginName,this.path + "/dialogs/file.js");

                    //给自定义插件注册一个调用命令
                    editor.addCommand( pluginName, new CKEDITOR.dialogCommand( pluginName ) );
                    //注册一个按钮,来调用自定义插件
                    editor.ui.addButton('File',
                            {
                                //editor.lang.mine是我在zh-cn.js中定义的一个中文项,
                                //这里可以直接写英文字符,不过要想显示中文就得修改zh-cn.js
                                label : '上传附件',
                                command : pluginName,
                                toolbar:"insert,25"
                            });
                }
            }
        );

} )();
c. 创建文件file.js
( function() {
CKEDITOR.dialog.add( 'file', function( editor )
{
return {
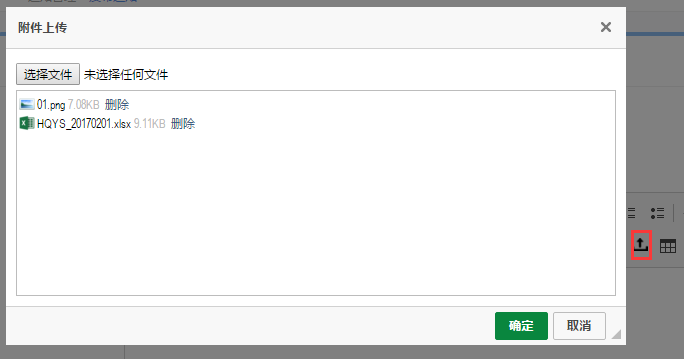
title : '附件上传',
minWidth : 600,
minHeight : 200,
contents : [
{
elements :
[
{
type : 'html',
html : '<input type="file" id="upload" name="upload" multiple/><div id="fileList" style="padding:2px;height:200px; border:1px solid #BCBCBC; margin-top:5px; overflow:auto;">\
</div>'
}
]
}
],
onLoad:function() {
$('#upload').fileupload({
url: ""+ctx+"ckeditor/uploadFile",
dataType: 'json',
done: function (e, data) {
$.each(data.result, function (index, file) {
var a = "<span><img style='position:relative;top:3px;' src=\""+ctx+"static/images/"+common.getImage(1,file.name)+"\"/><a style='margin-left:2px;' href=\"javascript:void(0)\" onclick=\"common.postSubmit('"+(file.downloadUrl+"&fileName="+file.name+"")+"');\">"+file.name+"</a> <span style='font-weight:normal;color:#BCBCBC;font-size:11px;'>"+common.getFileSize(file.size)+"</span>" +
"\<a class='delClass' style='color:#3D5E86;margin-left:5px;' href='javascript:void(0);' onclick=\"$(this).parent().remove();\">删除</a></span><br/>";
$("#fileList").append(a);
});
}
}).prop('disabled', !$.support.fileInput)
.parent().addClass($.support.fileInput ? undefined : 'disabled');
$("#fileList").niceScroll({cursorcolor:"#BCBCBC"}); // First scrollable DIV
},
onShow:function() {
$('#upload').val('');
$("#fileList").html('');
},
onOk: function() {
$("#fileList a.delClass").remove();
$("#fileList a.delClass").next().remove();
editor.insertHtml($("#fileList").html());
}
};
} );
} )();
d. icons目录下放入图标file.png
e. 使用插件
//自定义插件,上传附件
    config.extraPlugins = 'file';
使用效果
4.注意点
你保存正文后显示,如果你在设计页面的时候用了重置样式,那么富文本编辑器内容显示会受到影响。要么取消重置样式,要么单独将重置的样式还原回来。我非常痛苦地选择了后者。