作者归档:Rick

windows下Apache+tomcat集群-基于Proxy的方式

1. 准备工作

1.下载Apache:http://httpd.apache.org/
2. 下载Tomcat:http://httpd.apache.org/
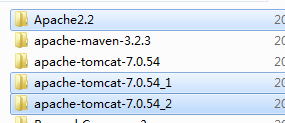
本人用的tomcat7,解压下来复制一份,就可以做两个tomcat的集群。
安装目录如下:

2. 集群配置

Tomcat配置
tomcat-7.0.54_1:
apache-tomcat-7.0.54_1\conf\server.xml:
更改端口,因为两个tomcat使用的默认端口都是8080,所有修改tomcat1的端口8081
Line 70:

<Connector port="8081" protocol="HTTP/1.1"  
              connectionTimeout="20000"  
              redirectPort="8443" />  

接着修改AJP的端口,默认8009,修改成8019,同时打开引擎如下:
Line92:

<Connector port="8109" protocol="AJP/1.3" redirectPort="8443" />  
  
  <!-- An Engine represents the entry point (within Catalina) that processes  
       every request.  The Engine implementation for Tomcat stand alone  
       analyzes the HTTP headers included with the request, and passes them  
       on to the appropriate Host (virtual host).  
       Documentation at /docs/config/engine.html -->  
  
  <!-- You should set jvmRoute to support load-balancing via AJP ie :  
  <Engine name="Catalina" defaultHost="localhost" jvmRoute="jvm1">  
  -->  
  <Engine name="Catalina" defaultHost="localhost" jvmRoute="tomcat1">  

tomcat-7.0.54_2:
端口使用tomcat默认的8080,AJP使用默认的端口8009,
只需要打开Engiee引擎

<Engine name="Catalina" defaultHost="localhost" jvmRoute="tomcat2">  

Apache配置:
Apache的默认端口是80
Apache2.2\conf\httpd.conf最后加入
ProxyRequests Off   

PS:1. 这儿的端口8009和8019是AJP的端口,不是访问Tomcat的HTTP端口。
       

  <proxy balancer://cluster>   
          BalancerMember ajp://127.0.0.1:8009 loadfactor=1 route=tomcat1  
          BalancerMember ajp://127.0.0.1:8109 loadfactor=1 route=tomcat2  
   </proxy>  

2.  route要和Tomcat中配置的名称相同。

集群配置完毕,可以往被集群的Tomcat的webapp下部署文件。启动Apache、Tomcat1、Tomcat2。
访问地址:http://localhost/项目名称。这里其实是访问的Apache服务器,由Apache集群去找Tomcat服务器。

quartz集成spring下的集群配置

写在前头

   
spring3.0
以后就开始支持quartz2.x,因为org.quartz.CronTrigger2.0class变成了一个interface,Spring4.0.6配置文件中使用CronTriggerFactoryBean来集成quartz2.x,使用CronTriggerBean来集成quartz1.8.x及以前版本.

准备环境

我用的是spring4.0.6 + quartz 2.1.7

1. quartz官网:http://www.quartz-scheduler.org/

2. spring集成环境

<dependency> 
    <groupId>org.quartz-scheduler</groupId> 
    <artifactId>quartz</artifactId> 
    <version>2.1.7</version> 
</dependency> 
<dependency> 
    <groupId>org.quartz-scheduler</groupId> 
    <artifactId>quartz-oracle</artifactId> 
    <version>2.1.7</version> 
</dependency> 
<dependency> 
    <groupId>org.quartz-scheduler</groupId> 
    <artifactId>quartz-weblogic</artifactId> 
    <version>2.1.7</version> 
</dependency> 
<dependency> 
    <groupId>org.quartz-scheduler</groupId> 
    <artifactId>quartz-jboss</artifactId> 
    <version>2.1.7</version> 
</dependency> 

环境搭建

1.      创建数据库表结构

文件路径:quartz-2.1.7\docs\dbTables\*.sql

选择对应数据库的脚本,然后执行。我选择的ORACLE.


2.      创建quartz.properties文件

#============================================================================ 
# Configure Main Scheduler Properties   
#============================================================================ 
org.quartz.scheduler.instanceName = EventScheduler    
org.quartz.scheduler.instanceId = AUTO   
  
org.quartz.threadPool.class = org.quartz.simpl.SimpleThreadPool  
org.quartz.threadPool.threadCount = 10  
org.quartz.threadPool.threadPriority = 5  
org.quartz.threadPool.threadsInheritContextClassLoaderOfInitializingThread = true  
  
 
#============================================================================ 
# Configure JobStore   
#============================================================================ 
org.quartz.jobStore.misfireThreshold = 60000  
org.quartz.jobStore.class = org.quartz.impl.jdbcjobstore.JobStoreTX 
# mysql  
#org.quartz.jobStore.driverDelegateClass=org.quartz.impl.jdbcjobstore.StdJDBCDelegate 
# Oracle  
org.quartz.jobStore.driverDelegateClass=org.quartz.impl.jdbcjobstore.oracle.OracleDelegate   
org.quartz.jobStore.tablePrefix = QRTZ_  
org.quartz.jobStore.maxMisfiresToHandleAtATime=10  
org.quartz.jobStore.isClustered = true   
org.quartz.jobStore.clusterCheckinInterval = 20000  

3.      创建spring配置文件applicationContext-job.xml

<?xml version="1.0" encoding="UTF-8"?> 
<beans xmlns="http://www.springframework.org/schema/beans" 
    xmlns:xsi="http://www.w3.org/2001/XMLSchema-instance" xmlns:context="http://www.springframework.org/schema/context" 
    xmlns:mvc="http://www.springframework.org/schema/mvc" 
    xmlns:p="http://www.springframework.org/schema/p" 
    xmlns:util="http://www.springframework.org/schema/util" 
    xsi:schemaLocation="     

http://www.springframework.org/schema/beans


http://www.springframework.org/schema/beans/spring-beans.xsd


http://www.springframework.org/schema/context


http://www.springframework.org/schema/context/spring-context.xsd


http://www.springframework.org/schema/mvc


http://www.springframework.org/schema/mvc/spring-mvc-3.1.xsd


http://www.springframework.org/schema/util

        http://www.springframework.org/schema/util/spring-util-3.2.xsd"> 
    <bean id="jobService" class="com.test.service.TestJobservice"/> 
    <!-- 定义任务 --> 
    <bean id="vcaEventJobTask" class="org.springframework.scheduling.quartz.JobDetailFactoryBean"> 
        <property name="jobClass"> 
            <!-- 上面的任务代理类 --> 
            <value>com.test.service.DetailQuartzJobBean</value> 
        </property> 
        <property name="jobDataAsMap"> 
            <map> 
                <!-- 实际的任务的Bean name,填上EventMonitorService的Bean name --> 
                <entry key="targetObject" value="jobService" /> 
                <!-- 执行Bean中的哪个方法 --> 
                <entry key="targetMethod" value="executeTask" /> 
            </map> 
        </property> 
        <property name="durability" value="true"></property>  
    </bean> 
  
    <!-- 任务触发器 --> 
    <bean id="eventTaskTrigger" class="org.springframework.scheduling.quartz.CronTriggerFactoryBean"> 
        <property name="jobDetail"> 
            <!-- 任务代理Bean name --> 
            <ref bean="vcaEventJobTask" /> 
        </property> 
        <property name="cronExpression"> 
            <!-- 配置表达式,这里表示每五分钟执行一次 --> 
            <value>0 0/1 * * * ?</value> 
        </property> 
    </bean> 
    <!-- 任务调度入口 --> 
    <bean autowire="no" 
        class="org.springframework.scheduling.quartz.SchedulerFactoryBean"> 
        <property name="dataSource"> 
            <ref bean="dataSource" /> 
        </property> 
        <!-- 任务列表,可以配置多个任务加入到该List --> 
        <property name="triggers"> 
            <list> 
               <ref bean="eventTaskTrigger"/>   
            </list> 
        </property> 
        <property name="configLocation" value="classpath:quartz.properties" /> 
        <property name="applicationContextSchedulerContextKey" value="applicationContext" /> 
        <property name="startupDelay" value="30" /> 
        <property name="autoStartup" value="true" /> 
        <property name="overwriteExistingJobs" value="true" /> 
    </bean> 
</beans> 

4.      创建任务类

代理类DetailQuartzJobBean.java

package com.test.service; 
import java.lang.reflect.Method; 
 
 
import org.quartz.JobExecutionContext; 
import org.quartz.JobExecutionException; 
import org.springframework.context.ApplicationContext;  
import org.springframework.scheduling.quartz.QuartzJobBean; 
 
public class DetailQuartzJobBean extends QuartzJobBean { 
     private ApplicationContext applicationContext;   
      
     private String targetObject; 
      
    private String targetMethod; 
      
     public String getTargetObject() { 
        return targetObject; 
    } 
 
 
    public void setTargetObject(String targetObject) { 
        this.targetObject = targetObject; 
    } 
 
    public String getTargetMethod() { 
        return targetMethod; 
    } 
 
    public void setTargetMethod(String targetMethod) { 
        this.targetMethod = targetMethod; 
    } 
 
 
    public ApplicationContext getApplicationContext() {  
        return applicationContext; 
    } 
       
     /** 
       * 从SchedulerFactoryBean注入的applicationContext. 
       */   
     public void setApplicationContext(ApplicationContext applicationContext) {   
        this.applicationContext = applicationContext;   
    }   
       
        @Override   
    protected void executeInternal(JobExecutionContext ctx) 
            throws JobExecutionException { 
        try { 
 
 
            // logger.info("execute [" + targetObject + "] at once>>>>>>"); 
            Object otargetObject = applicationContext.getBean(targetObject); 
            Method m = null; 
            try { 
                m = otargetObject.getClass().getMethod(targetMethod, 
                        new Class[] {}); 
                m.invoke(otargetObject, new Object[] {}); 
            } catch (SecurityException e) { 
                // logger.error(e); 
            } catch (NoSuchMethodException e) { 
                // logger.error(e); 
            } 
 
 
        } catch (Exception e) { 
            throw new JobExecutionException(e); 
        } 
    } 
} 

目标类TestJobservice.java

package com.test.service; 
 
import java.text.SimpleDateFormat; 
import java.util.Date; 
 
import org.slf4j.Logger; 
import org.slf4j.LoggerFactory; 
 
public class TestJobservice { 
 
    private static final transient Logger logger = LoggerFactory.getLogger(TestJobservice.class);   
     
    public void executeTask() { 
        logger.info("executing at " + new SimpleDateFormat("yyyy-MM-dd HH:mm:ss").format(new Date())); 
    } 
} 
 

Jquery插件范例

今天学习了Javascript的闭包和jQuery编写插件的实例,乘着热乎劲,写了个小的功能。

Html

<p>Hello Javascript<p>

Javacript

/*
    This is just a test!!!
     Hilight text,user-defined css style by function format
    @author Rick.Xu
*/

(function($) {
    var defaluts =  {
        css:{"color":"black","background-color":"yellow"}
       };

    $.fn.extend({hilight:function(settings) {
        var opts = $.extend(true,{},defaluts,settings);  
        return this.each(function() {
            var $this = $(this);
            if(opts.format) {
                var txt = opts.format($this.html());
                $this.html(txt);
            }
            $this.css(opts.css);
            
        });
    }});
})(jQuery);

$(function() {
    $("p").hilight({
        css:{
            color:"red"
        },
        format:function(txt) {
            return "<I>"+txt+"</I>";
        }
    });
});

Result:

Hello Javascript

jQuery插件开发

设计与技术选型

本文转载于:https://github.com/springside/springside4/wiki/Design

1. Web

  • MVC FramworkSpringMVC3.0 Restful的风格终于回归了MVC框架的简单本质,对比之下Struts2概念太复杂更新又太懒了。

  • TemplateJSP2.0且尽量使用JSP EL而不是taglib,万一要写taglib也用纯JSP来编写,一向是SpringSide的推荐,Freemarker们始终有点小众, 而Thymeleaf与美工配合度非常高,可惜也是太少用户了。

  • Layout Decoration: Tiles的配置都太复杂了,SiteMesh2好些,但Sitemesh3烂尾了。

  • Javascript Library: 随大流用了JQuery。其实Dojo的面向对象语法更优美,但用户数和插件社区差了点。

  • CSS Framework: 最热火的Twitter Bootstrap,提供了简便的布局能力和基本的页面美化。

  • JavaScript/CSS Compressor: 还是随便选的YUI Compressor

  • Validation: JQuery Validation Plugin这种客户端校验的客户体验更好,而Spring MVC集成Hibernate Valiator的服务端校验则可以避免恶意用户跳过页面直接发送请求,校验规则也更多,需要混合使用。

    2. WebService

  • SOAP WebServiceJAX-WS2.0的注解 + Apache CXF 无疑是最成熟的,一说起Axis1/2我都要打冷颤。

  • Restful ServiceJAX-RS 1.0 + Jersey/CXF,够标准。但直接使用Spring MVC能使架构更简单。 如果追求极致的性能标,直接写Servlet也没啥。

  • Restful Client: 刚出来的JAX-RS 2.0标准,实际是用Jersey的client api做蓝本的, 而直接使用Spring的RestTemplate可以减少第三方包的引入。

为了隔绝变化影响,隐藏细节,对外暴露的DTO和应用内部的领域对象是不同的类型,用Dozer进行复制。

请求参数的校验,JSR303 Bean Validator的实现Hibernate Validator没太多的竞争对手。

3. Database

  • 数据库设计基本原则:
    1.主键的列名统一为id。
    2.为方便数据操作及维护,不建立任何外键,用程序去保证关联关系。
    3.为表名添加前缀以便日后管理。比如有几十个表,将联系比较紧密的表,使用相同的前缀。
    4.表名全小写,因为MySQL在Linux下默认区分表名大小写。

  • ORM Framework: 快速开发的应用里,领域对象肯定是用JPA标注的。至于API用Hibernate还是JPA,因为那个极简便的,DAO只要写接口就好了的Spring-Data-JPA,所以选了JPA。 当然,JPA的实现还是用Hibernate。

追求高性能的应用,如各种Web服务,当然就是MyBatis了。如果项目再简单点,Spring JDBC其实也不错。

  • 传统数据库: 无非还是OracleMySQL的选择,如果你恨MySQL还是Oracle家的东西,可以考虑越来越多人用的,语法和Oracle很像的Postgresql

  • NOSQL数据库: 国内用的比较多的还是RedisMongoDB.Redis更像一个数据结构服务器,暴露各种数据结构的专有API。而MongoDB将数据存成BSON格式,也提供类似SQL的查询语句,更像一个schema-less的数据库。

  • 数据库连接池: Apache DBCP本来一统江湖,现在被人批评又慢又复杂,所以有了Tomcat JDBC,另外温少的Druid也是一个选择。

  • Cache:在JVM里的缓存,最老牌最多人用的依然是Ehcache,一些更强大的DataGrid方案如HazelCast,JBoss的Infinispan反而没什么人用。另外最简单的JVM内缓存是Guava的Cache。

而中央式的缓存,Memcached已经成为了事实标准。而且当主创撒手不管后,社区现在反而有着稳定的更新。 Client方面,比较稳健选择的还是Spymemcached

3. Services

  • Security Framework: 选择Apache Shiro是因为SpringSecurity的代码复杂度已经超过了它的实际需要,扩展困难痛苦。另一个原因是SpringSecurity的基本API居然只支持基于角色的判断,e.g. hasRole(“Administrator”),而Shiro同时还支持我们其实更常用的基于Permission的判断,e.g. hasPermission(“User:Edit”)。

  • JMSActiveMQ是最多人选用的应用服务器无关的JMS实现,JBoss的HornetQ同样只是JBoss的用户在使用。Spring自带的JMS封装很好用。但还有更高级的如支持跨平台的AMQP协议RabbmitMQ

  • Schedule: 对于固定时间间隔的任务,JDK自带的Executor已足够好。Cron式定时执行,Spring的Scheduler也能满足。而且Spring的提供的纯XML配置也让Scheduler变得很简单,Quartz更大的优势体现在保证集群中有且仅有一台服务器执行任务。另外,SpringSide还演示了基于Redis做了一个适合海量的只需单次触发的任务。

  • JMX: Jolokia能将JMX中的MBean以Restful+JSON的方式暴露出来,使JMX这个古老的,在平台互通中显得有点封闭的协议重新焕发了青春。而Spring-Jmx将普通POJO注释一下就变成MBean也非常方便。

4. Utilizes

  • GeneralApache Commons Lang说是伴着我们长大的也不为过,3.0版连package名也改了,全面支持泛型。Guava 是Google新鲜推出的优雅产品。但说它会一桶天下又不定,因为它有时候太新潮了,反而用不惯。比如StringUtils我还是喜欢用Apache的,IO也同样是Apache Commons IO的好使。

  • XML: 用JDK自带的JAXB就算了,不折腾。

  • JSON: GSon虽然系出名门而且接口优雅,但Jackson的功能更加丰富到匪夷所思,而且比GSon快很多。

  • Email: Spring自带的Email封装挺好用的。

  • Logging: Slf4j作为入口,早就替代了Apache Common Logging了,下面的实现Log4j 1.x 被批判太多同步方法太慢,Log4j作者的后作Logback就好很多了,但社区似乎不甘心log在一家QOS公司手里,又在推动log4j2.0的发展,目前还是beta版。

最后,Freemarker虽然不用来做页面Template,平时用来生成点东西也不错的。 JodaTime这种要直接加入JDK的就不多说它了。HttpClient用Apache HttpClient还是用JDK自带的要看情况,简单的用JDK,需要keep alive什么的用Apache。

5. Test

  • Unit TestJUnit始终是正统,TestNG的功能如测试用例分组它也慢慢支持了。

  • MockMockito的API比老牌的EasyMock更为优雅,而PowerMock则能配合Mockito完成static方法,函数内部new 出来的对象这些Mockito做不了的mock。

  • Functional Test:Selenium与WebDriver的合并后,最大改进是原来基于javascript的方案, 变成了直接调用浏览器的核心API,性能好了。

6. Development Environment

JDK6这样没什么兼容性问题又成熟得一塌糊涂的版本建议大家都升级吧。JDK7也不错,有G1垃圾收集器和Try-Catch新语法的语法糖。

用Jetty7是因为它的嵌入式版本做得好,集成测试不用部署直接就开跑了。开发时一般也不用Eclipse插件,直接自己在代码里启动了,省下打包拷贝War文件的时间。

H2 Database,既是嵌入式的,又可以持久化到文件用Web Console查看,性能还是嵌入式中最好的。

Maven,在项目构建脚本不复杂的时候的首选,否则就只能ant+ivy了,或者像hibernate和spring一样,用gradle.

另外,用Log4jdbc在开发时查看实际执行的SQL。

最后,用Jenkins做持续集成,Sonar做代码质量检查,是大部分好项目的共同爱好。

yum安装搭建LAMP下的wordpress

yum安装搭建LAMP下的wordpress

阿里云申请相关服务:http://www.aliyun.com/

1.       云服务器 1

a)         优选选择包年包月的,按流量付费的比较贵

b)         购买完成后记下公网IP,登陆主机的usernamepassword

c)         通过winscpputty部署程序

2.       关系型数据库 1(可选的)

a)         如果不购买数据库,需要自己安装数据库到云服务器。因为阿里的服务器可以提供更多的服务而且价格也不贵。目前是5/月。

b)         创建数据库,创建用户,并授权访问。记下公网访问地址。

3.       域名申请

a)         到阿里旗下的万网申请一个域名,绑定到IP,当然这也是可选的。


如果按照Linux环境搭建运行环境

1.       安装apache

yum y install httpd

2.       安装Mysql(如果购买的数据库就不需要安装)

#yum -y install mysql mysql-server mysql-devel

配置mysql开机启动服务

#chkconfig --add mysqld (在服务清单中添加mysql服务)
#chkconfig mysqld on (设置mysql服务随开机启动)
#service mysqld start (启动mysql服务)

3.       安装php

#yum -y install php
#service httpd restart (重启apache)


修改文件httpd.conf

添加:

AddType application/x-httpd-php .php .html .htm

修改 “index.php”

<IfModule dir_module>
    DirectoryIndex index.php index.html
</IfModule>

4.       安装php的相关组件 (重要)

#yum search php (搜索php相关的组件)
#yum -y install php-mysql php-gd php-imap php-ldap php-odbc php-pear php-xml php-xmlrpc
安装完成后重启apache服务
#service httpd restart

5.       这样就配置完成,编写测试代码

#vi /var/www/html/index.php

输入测试代码

<?php
phpinfo();
?>

部署wordpress程序

利用工具winscpputty,下载代码并上传到/var/www/html

对文件夹进行授权读写:

#chmod -R 777 /var/www/html


登陆ip/wp-admin/install.php进行配置数据库,按照提示执行。