<?xml version="1.0" ?>
<project name="AntExample1" default="war">

    <path id="compile.classpath">
        <fileset dir="WebContent/WEB-INF/lib">
            <include name="*.jar"/>
        </fileset>
        <fileset dir="D:\develop\jboss-eap-6.2\modules\system\layers\base">
            <include name="**/*.jar"/>
        </fileset>
    </path>

    <target name="init">
        <mkdir dir="build/classes"/>
        <!--拷贝非java文件-->
        <copy includeemptydirs="false" todir="build/classes">
            <fileset dir="src">
                <exclude name="**/*.java"/>
            </fileset>
        </copy>

        <mkdir dir="dist" />
    </target>

    <target name="compile" depends="init" >
        <javac destdir="build/classes" debug="true" encoding="UTF-8">
            <classpath refid="compile.classpath"/>
            <src path="src"/>
        </javac>
    </target>

    <target name="war" depends="compile">
        <war destfile="dist/SpaceMgt_HK.war" webxml="WebContent/WEB-INF/web.xml">
            <fileset dir="WebContent"/>
            <!--<lib dir="WebContent/WEB-INF/lib"/>-->
            <classes dir="build/classes"/>
        </war>
    </target>

    <target name="clean">
        <delete dir="dist" />
        <delete dir="build" />
    </target>

</project>
作者归档:Rick
用Maven分环境打包非Maven项目
现在有一个项目,不是用
maven构建的,想通过maven进行各个环境的打包,比如dev/sit/prd环境jdbc.properties是不相同的。不能破坏原来的目录结构,同时实现以下功能:
1. 多环境打包
2. 结合ant插件清理临时文件,支持war上传FTP
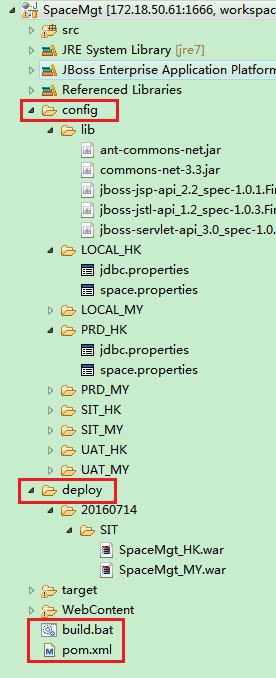
工程目录

修改如下
* 创建文件夹config放置文件jdbc.properties和打包所需要的provided jar
* 添加pom.xml
* bat执行脚本
1 .配置文件目录
config是在项目的一级目录,和src同一级
|-config
|-LOCAL_HK
|-jdbc.properties
|-SIT_HK
|-jdbc.properties
2. pom.xml
<?xml version="1.0" encoding="UTF-8"?>
<project xmlns="http://maven.apache.org/POM/4.0.0" xmlns:xsi="http://www.w3.org/2001/XMLSchema-instance"
    xsi:schemaLocation="http://maven.apache.org/POM/4.0.0 http://maven.apache.org/maven-v4_0_0.xsd">
    <modelVersion>4.0.0</modelVersion>
    <groupId>com.asw.spacemgt</groupId>
    <artifactId>asw</artifactId>
    <version>V1.5.0.${maven.build.timestamp}</version>
    <packaging>war</packaging>
    <name>SpaceMgt</name>

    <properties>
        <maven.build.timestamp.format>yyyyMMdd</maven.build.timestamp.format>
        <!-- 文件拷贝时的编码 -->
        <project.build.sourceEncoding>UTF-8</project.build.sourceEncoding>
        <project.reporting.outputEncoding>UTF-8</project.reporting.outputEncoding>
        <!-- 编译时的编码 -->
        <maven.compiler.encoding>UTF-8</maven.compiler.encoding>
        <!--ftp配置信息 -->
        <ftp.server>172.18.50.126</ftp.server>
        <ftp.userid>alex</ftp.userid>
        <ftp.password>movit123.</ftp.password>
    </properties>

     <build>
        <!-- java code -->
        <sourceDirectory>src</sourceDirectory>

        <resources>
            <resource>
                <!--
                获取资源文件
                *.hbm.xml
                *.properties

                排除java文件+要替换的文件
                -->
                <directory>src</directory>
                <excludes>
                    <exclude>**/jdbc.properties</exclude>
                    <exclude>**/space.properties</exclude>
                    <exclude>**/*.java</exclude>
                </excludes>
            </resource>
            <resource>
                <!--执行文件替换-->
                <directory>config/${env}</directory>
                <targetPath>resource</targetPath>
            </resource>
        </resources>

        <plugins>
            <plugin>
                <groupId>org.apache.maven.plugins</groupId>
                <artifactId>maven-surefire-plugin</artifactId>
                <configuration>
                    <skip>true</skip>
                </configuration>
            </plugin>
            <plugin>
                <groupId>org.apache.maven.plugins</groupId>
                <artifactId>maven-compiler-plugin</artifactId>
                <configuration>
                    <source>1.7</source>
                    <target>1.7</target>
                    <encoding>UTF-8</encoding>
                    <compilerArguments>
                        <!--本地jar-->
                        <extdirs>WebContent\WEB-INF\lib</extdirs>
                    </compilerArguments>
                </configuration>
            </plugin>
            <plugin>
                <groupId>org.apache.maven.plugins</groupId>
                <artifactId>maven-war-plugin</artifactId>
                <configuration>
                    <webResources>
                        <resource>
                            <!--web app位置-->
                            <directory>WebContent</directory>
                        </resource>
                    </webResources>

                    <webXml>WebContent\WEB-INF\web.xml</webXml>
                </configuration>
            </plugin>
            <plugin>
               <artifactId>maven-antrun-plugin</artifactId>
               <version>1.7</version>
               <executions>
                    <execution>
                               <id>default-cli</id>
                               <goals>
                                     <goal>run</goal>
                               </goals>
                               <configuration>
                                    <target>
                                        <!--删除maven打包产生的临时目录-->
                                        <delete includeemptydirs="true">
                                            <fileset dir="deploy" >
                                                <exclude name="${maven.build.timestamp}/**/*.war"/>
                                            </fileset>
                                        </delete>
                                         <!--通过ftp创建文件夹-->
                                        <ftp server="${ftp.server}" userid="${ftp.userid}" password="${ftp.password}" action="mkdir" remotedir="/Space/war/sit/${maven.build.timestamp}"></ftp>
                                        <!--上传到FTP-->
                                        <ftp server="${ftp.server}" action="put" passive="true" remotedir="/Space/war/sit/${maven.build.timestamp}" userid="${ftp.userid}"
                                        password="${ftp.password}"  separator="/" verbose="yes" binary="yes">
                                             <fileset dir="deploy/${maven.build.timestamp}/SIT">
                                             </fileset>
                                         </ftp>
                                    </target>
                               </configuration>
                    </execution>
                </executions>
                <!--上传ftp依赖的jar-->
                <dependencies>
                     <dependency>
                        <groupId>commons-net</groupId>
                        <artifactId>commons-net</artifactId>
                        <version>3.3</version>
                        <scope>system</scope>
                        <systemPath>${project.basedir}/config/lib/commons-net-3.3.jar</systemPath>
                     </dependency>
                     <dependency>
                        <groupId>org.apache.ant</groupId>
                        <artifactId>ant-commons-net</artifactId>
                        <version>1.0</version>
                        <scope>system</scope>
                        <systemPath>${project.basedir}/config/lib/ant-commons-net.jar</systemPath>
                     </dependency>
                </dependencies>
            </plugin>
        </plugins>
    </build>

    <profiles>
        <profile>
            <id>LOCAL_HK</id>
            <properties>
                <env>LOCAL_HK</env>
                <buCode>HK</buCode>
            </properties>
            <build>
                <finalName>SpaceMgt_${buCode}</finalName>
                <directory>deploy/${maven.build.timestamp}/LOCAL</directory>
            </build>
        </profile>
        <profile>
            <id>SIT_HK</id>
            <properties>
                <env>SIT_HK</env>
                <buCode>HK</buCode>
            </properties>
            <build>
                <finalName>SpaceMgt_${buCode}</finalName>
                <directory>deploy/${maven.build.timestamp}/SIT</directory>
            </build>
        </profile>
    </profiles>

    <dependencies>
        <!-- lib不存在javax相关jar,编译期使用,不会打到war中 -->
        <dependency>
            <groupId>jboss</groupId>
            <artifactId>servlet</artifactId>
            <version>1.0</version>
            <scope>system</scope>
            <systemPath>${project.basedir}/config/lib/jboss-servlet-api_3.0_spec-1.0.2.Final-redhat-1.jar</systemPath>
        </dependency>
        <dependency>
            <groupId>jboss</groupId>
            <artifactId>jsp</artifactId>
            <version>1.0</version>
            <scope>system</scope>
            <systemPath>${project.basedir}/config/lib/jboss-jsp-api_2.2_spec-1.0.1.Final-redhat-2.jar</systemPath>
        </dependency>
        <dependency>
            <groupId>jboss</groupId>
            <artifactId>jstl</artifactId>
            <version>1.0</version>
            <scope>system</scope>
            <systemPath>${project.basedir}/config/lib/jboss-jstl-api_1.2_spec-1.0.3.Final-redhat-2.jar</systemPath>
        </dependency>
    </dependencies>
</project>
3. bat脚本
编写bat脚本build.bat
@echo build war
call mvn package -PLOCAL_HK
call mvn package -PSIT_HK
call mvn antrun:run
双击build.bat文件会在deploy文件下分目录产生,同时上传FTP。
最终目录结构:
相关链接:
获取FTP文件最后修改时间
-
如果FTP server和Web Server同一个时区
使用方法org.apache.commons.net.ftp.FTPClient#getModificationTimepublic String getModificationTime(String pathname)
throws IOException
Issue the FTP MDTM command (not supported by all servers) to retrieve the last modification time of a file. The modification string should be in the ISO 3077 form “YYYYMMDDhhmmss(.xxx)?”. The timestamp represented should also be in GMT, but not all FTP servers honour this.
Parameters:
pathname – The file path to query.
Returns:
A string representing the last file modification time in YYYYMMDDhhmmss format.
Throws:
IOException – if an I/O error occurs.
Since:
2.0该函数会获取
GMT时间,格式为:213 20160125035757。这时间和北京时间会差8个小时。按空格拆分字符串后使用如下方法获取北京时间20160125115757,主要是格式化添加时区sdf.setTimeZone(TimeZone.getTimeZone("GMT")),而不能按照默认的北京时间。因为FTP server和Web Server同一个时区,所以时间是一致的。
public static long getLongFromGMTDateString(String gmtDate, String format) throws Exception {
        SimpleDateFormat sdf = new SimpleDateFormat(format);
        sdf.setTimeZone(TimeZone.getTimeZone("GMT")); //默认就是系统设置时区
        Date date = sdf.parse(gmtDate);
        return date.getTime();   // Unix时间戳
}
-
如果FTP server和Web Server不在同一个时区
需要结合另外第一个方法org.apache.commons.net.ftp.FTPFile#getModificationTimepublic Calendar getTimestamp()
Returns the file timestamp. This usually the last modification time.
Returns:
A Calendar instance representing the file timestamp.这可以获取FTP时区的的最后修改时间,但是没有秒,结合方法
getModificationTime获取秒,拼接起来就可以获取完整的FPT文件最后修改时间。
常识
- Unix时间戳 1453694277000
->北京时间 2016/1/25 11:57:57
-> GMT 2016/1/25 03:57:57 - GMT –>北京时间
GMT-> Unix时间戳 -> 北京时间
jboss-eap-6.2 JNDI配置数据源Oracle&sql server
jboss-eap-6.2 JNDI配置数据源Oracle&sql server
- Oracle数据源
- 创建模块,jboss-eap-6.2\modules\system\layers\base目录下,创建目录com\oracle\main
- 拷贝ojdbc14-10.2.0.4.0.jar和module.xml
module.xml
<?xml version="1.0" encoding="UTF-8"?>
<module xmlns="urn:jboss:module:1.1" name="com.oracle">
    <properties>
        <property name="jboss.api" value="public"/>
    </properties>
    <resources>
        <resource-root path="ojdbc14-10.2.0.4.0.jar"/>
        <!-- Insert resources here -->
    </resources>
    <dependencies>
        <module name="javax.api"/>
        <module name="javax.transaction.api"/>
        <module name="javax.servlet.api" optional="true"/>
    </dependencies>
</module>
- 修改jboss-eap-6.2\standalone\configuration\standalone.xml
standalone.xml
<datasource jta="true" jndi-name="java:jboss/datasources/OracleDS" pool-name="OracleDS" enabled="true" use-java-context="true">
    <connection-url>jdbc:oracle:thin:@127.0.0.1:1521:ORCL</connection-url>
    <driver>oracle</driver>
    <pool>
        <prefill>false</prefill>
        <use-strict-min>false</use-strict-min>
        <flush-strategy>FailingConnectionOnly</flush-strategy>
    </pool>
    <security>
        <user-name>rick</user-name>
        <password>jkxyx205</password>
    </security>
</datasource>
<driver name="oracle" module="com.oracle">
    <driver-class>oracle.jdbc.driver.OracleDriver</driver-class>
</driver>
- sql server数据源同上,仅给出配置文件sql server
module.xml
<?xml version="1.0" encoding="UTF-8"?>
<module xmlns="urn:jboss:module:1.1" name="com.microsoft.sqlserver.jdbc">
    <properties>
        <property name="jboss.api" value="public"/>
    </properties>
    <resources>
        <resource-root path="sqljdbc4.jar"/>
        <!-- Insert resources here -->
    </resources>
    <dependencies>
        <module name="javax.api"/>
        <module name="javax.transaction.api"/>
        <module name="javax.servlet.api" optional="true"/>
    </dependencies>
</module>
<driver name="sqlserver" module="com.microsoft.sqlserver.jdbc">
    <driver-class>com.microsoft.sqlserver.jdbc.SQLServerDriver</driver-class>
</driver>
-
注意点模块下包的结构和name对应起来
-
Spring使用JNDI数据源
<?xml version="1.0" encoding="UTF-8" ?>
<beans xmlns="http://www.springframework.org/schema/beans"
       xmlns:xsi="http://www.w3.org/2001/XMLSchema-instance"
       xmlns:aop="http://www.springframework.org/schema/aop"
       xmlns:tx="http://www.springframework.org/schema/tx"
       xmlns:context="http://www.springframework.org/schema/context"
       xmlns:jee="http://www.springframework.org/schema/jee"
       xsi:schemaLocation="http://www.springframework.org/schema/beans

http://www.springframework.org/schema/beans/spring-beans.xsd


http://www.springframework.org/schema/aop


http://www.springframework.org/schema/aop/spring-aop.xsd


http://www.springframework.org/schema/tx


http://www.springframework.org/schema/tx/spring-tx.xsd


http://www.springframework.org/schema/context


http://www.springframework.org/schema/context/spring-context.xsd

    http://www.springframework.org/schema/jee http://www.springframework.org/schema/jee/spring-jee-4.0.xsd
    ">

   <jee:jndi-lookup id="myDataSource1" jndi-name="java:jboss/datasources/OracleDS" />
   <jee:jndi-lookup id="myDataSource2" jndi-name="java:jboss/datasources/MssqlDS" />
</beans>
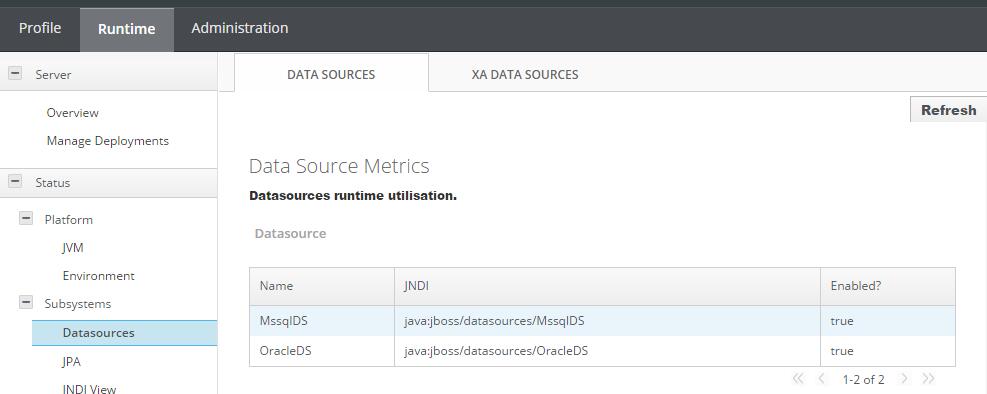
- 控制台查看数据源
如果无法进入控制台,需要配置用户和组,执行jboss-eap-6.2\bin\add-user.bat,按照提示执行。
uwsgi部署Django
uwsgi部署Django
此处省去安装Django的步骤,可以参考Django初体验
项目开发
- 创建项目
cd /var/www/
django-admin.py startproject xhope
cd /xhope

|-- xhope
|   |-- __init__.py
|   |-- settings.py
|   |-- urls.py
|   `-- wsgi.py
`-- manage.py
初始化目录如上所示。
- 添加项目功能
a. 在settings.py添加模块blog,同时配置mysql数据库
b. 添加视图views.py
from django.http import HttpResponse
import json
from blog.models import wp_posts
from PyJSONSerialization import dump #别人写的插件 Object-->Json String
from django.shortcuts import render

def listPosts(request):

    request.encoding='utf-8'
    if 'post_title' in request.GET:
        post_title =  request.GET['post_title'].encode('utf-8')
    else:
        post_title = ''

    #print post_title
    posts = wp_posts.objects.filter(post_status='publish',post_type='post',post_title__contains='%s'%(post_title)).order_by("-id")

    '''
    print isinstance(posts, list)

    postsArr = [];
    for post in posts:
        postsArr.append(post)

    print dump(postsArr)
    '''
    context = {}
    context['posts'] = posts
    context['post_title'] = post_title
    return render(request, 'list.html', context)
c. 添加模型 models.py
from __future__ import unicode_literals
from django.db import models
import json

# Create your models here.
class wp_posts(models.Model):
    class Meta:
        db_table = "wp_posts"

    post_date = models.DateField
    post_title = models.CharField(max_length=20)
    post_status = models.CharField(max_length=20)
    post_type = models.CharField(max_length=20)

    id = models.AutoField
d. 配置访问路径urls.py
from django.conf.urls import *
from blog.views import listPosts

urlpatterns = patterns("",
    ('^listPosts/$', listPosts),
)
f. 模板文件 list.html
<!DOCTYPE html>
<html lang="en">
<head>
    <meta charset="UTF-8">
    <title>list</title>
    <style>
        ul, li {
            border: 0;
            margin: 0;
            padding:0;
        }

        li {
            font-size: 13px;
            font-family: "黑体";
            padding: 2px;
        }
    </style>
</head>
<body>
    <form action="http://121.42.151.190:8000/listPosts/">
        <input type="text" name="post_title" value="{{post_title}}" /><button>查询</button>
    </form>

    <ul>
        {% for post in posts %}
        <li>{{ post.post_title }}</li>
        {% endfor %}
    </ul>
</body>
</html>
测试运行
python manage.py runserver 0.0.0.0:8000
访问地址:http://121.42.151.190:8000/listPosts
uWSGI部署Django
uwsgi --http :8000 --chdir /var/www/xhope/ --wsgi-file /var/www/xhope/xhope/wsgi.py --daemonize=/var/www/xhope/uwsgi9090.log
访问地址:http://121.42.151.190:8000/listPosts
Django Nginx+uwsgi 安装配置 参照http://www.runoob.com/django/django-nginx-uwsgi.html
但我一直没有执行成功过。